
|

|
The Printing Cookbook
Patrick A Powell
papowell@lprng.com
AStArt Technologies
9475 Chesapeake Dr, Suite D,
San Diego, CA 92123
Phone 858-874-6543
Fax 858-279-8424
Copyright © 2001 by Patrick Powell
- Table of Contents
- Preface
-
- 1. Acknowledgements
- 2. Conventions
- 3. Disclaimer
- 1. Introduction - The Basics and Variations
- 2. Simple Spooling
- 3. Printers
-
- 3.1. Interface
- 3.2. Parallel Port
- 3.3. Network Ports
- 3.4. Sending To SMB (Samba, Microsoft) Printer, Novell, Appletalk
- 3.5. Serial Port
- 4. Printer Job Formats
-
- 4.1. PostScript
- 4.2. PCL
- 4.3. Printer Job Language (PJL) and PostScript, PCL
- 4.4. Text Files
- 4.5. Magical Mystery Proprietary Format
- 4.6. Printing Test Pages
- 5. Filters
- 6. Banner Pages and Accounting
-
- 6.1. Suppressing Banner Pages
- 6.2. Forcing Banner Pages
- 6.3. Generating Banner Pages
- 6.4. Accounting
- 6.5. Accounting Gotchas
- 6.6. Accounting Including Banner Pages
- 7. Printer Pools and Load Sharing
- 8. Wildcards, Bounce Queues, and Forwarding
- 9. Form Support and Hold Queues
-
- 9.1. Hold Queues
- 10. Interfacing to Vintage, Legacy, and SunOS Print Spoolers
- 11. Managing Enterprise Level Printing Systems
- 12. LPRngTool
- A. LPRng
-
- A.1. Documentation
- A.2. Installation
- A.3. License
- A.4. Commercial Support
- A.5. Web Site, FTP Site, and Mirrors
- A.6. Mailing List
- A.7. PGP Public Key
- B. References and Standards
-
- B.1. RFCs
- B.2. PostScript
- B.3. HP PCL 5
- B.4. HP PJL
- B.5. PDF
- C. RFC 1179 - Line Printer Daemon Protocol
-
- C.1. Ports and Connections
- C.2. Protocol Requests and Replies
- C.3. Job Transfer
- C.4. Data File Transfer
- C.5. Control File Contents
- C.6. lpq Requests
- C.7. lprm Requests
- C.8. LPC Requests
- C.9. Block Job Transfer
- C.10. Authenticated Transfer
- List of Tables
- 3-1. Network Print Server Configuration Information
- C-1. RFC1179 Commands
- C-2. Control File Lines and Purpose
- C-3. LPC Commands
- List of Figures
- 1. lpq status
- 1-1. Print Spooler Architecture
- 1-2. Configuration Files
- 1-3. Printcap
- 1-4. lpd.conf Defaults File
- 1-5. lpd.perm Permissions File
- 1-6. Clients and Configuration Files
- 1-7. ${HOME}/.printcap Information
- 1-8. Using checkpc
- 1-9. Using checkpc -f
- 2-1. Basic Printcap Entry
- 2-2. Run checkpc
- 2-3. Check for Running Server
- 2-4. Run lpq
- 2-5. Run lpc
- 2-6. Run lpr
- 2-7. Run lprm
- 2-8. Enable Printing
- 2-9. Using lpr -V
- 2-10. The lpr Options
- 2-11. Debug Options
- 2-12. The lpr -D1 Output
- 2-13. Using lpr -Dnetwork
- 2-14. Debugging lpq
- 2-15. Basic lpq Information
- 2-16. Using the lpq -l Option
- 2-17. Using the lpq -L Option
- 2-18. Job Completion
- 2-19. Summary Status Displays
- 2-20. lpd Options
- 2-21. Using lpd Debug Options
- 2-22. Debugging Spool Queue
- 2-23. Setting Queue Debug Options
- 2-24. log File
- 3-1. Printer Types
- 3-2. Interface Types
- 3-3. Parallel Port
- 3-4. Parallel Port Printcap
- 3-5. Loading Linux Parallel Port Driver
- 3-6. Parallel Port Problems
- 3-7. Network Ports
- 3-8. Network Port Printcap
- 3-9. Benefits of Network Port Printcap
- 3-10. Network Print Server
- 3-11. Using Program To Send To Printer
- 3-12. Protocols, Packages, and Transfer Programs
- 3-13. Printcap For Transfer Programs
- 3-14. Samba smbclient Wrapper
- 3-15. $PRINTCAP_ENTRY
- 3-16. Novell and Appletalk Wrappers
- 3-17. Serial Port
- 3-18. Serial Port Printcap
- 4-1. Page Description Lanaguages
- 4-2. How To Identify Print Formats
- 4-3. Using the file Application
- 4-4. One PostScript Page
- 4-5. Generate One Page
- 4-6. PostScript Document Structuring Conventions
- 4-7. Tools for PostScript Document Manipulation
- 4-8. Selection of Pages + 4up Printing
- 4-9. PostScript Output
- 4-10. End Of PostScript Job: ^D (CTRL-D)
- 4-11. One PCL Page
- 4-12. Generate One Page
- 4-13. PJL Example
- 4-14. Text Files and The Jaggies
- 4-15. Fixing The Jaggies
- 4-16. Magical Mystery Formats
- 4-17. GhostScript To The Rescue
- 4-18. GhostScript Devices
- 4-19. GhostScript Support
- 4-20. Printing Test Pages To Parallel Port
- 4-21. Using Netcat (nc)
- 5-1. Filters
- 5-2. Filter Specification in Printcap Entry
- 5-3. Specifying Job Datafile Format
- 5-4. Filter Execution Environment
- 5-5. Command Line Options
- 5-6. Filter Exit Codes
- 5-7. Solid As A Rock Filter Operation
- 5-8. Solid As A Used Paper Coffee Filter Operation
- 5-9. Filter Template in perl
- 5-10. How To Determine The Type of Job File
- 5-11. Printcap for Filter
- 5-12. Using Filter With $debug=1
- 5-13. Using Filter With $debug=0
- 5-14. ifhp
- 5-15. ifhp.conf Configuration Information
- 5-16. Default Printer Magic Cookies
- 5-17. PostScript Only Printer
- 5-18. Using the ifhp Filter
- 5-19. Example of ifhp Operation
- 5-20. Using -Z to Pass Options to ifhp
- 5-21. Testing ifhp Operations
- 5-22. Phaser/Appsocket Support
- 6-1. Changing JetDirect Configuration
- 6-2. Printcap Option :sh and lpr -h (No Header) Option
- 6-3. Removing Banner Lines
- 6-4. Forcing Banner Pages
- 6-5. Generating Banner Page
- 6-6. Basic Accounting Information
- 6-7. Accounting File Information
- 6-8. Filter Accounting Information
- 6-9. Accounting Gotchas
- 6-10. Accounting Using Banner Pages
- 7-1. Printer Pools and Load Sharing
- 7-2. Load Balancing Printcap
- 7-3. Load Balancing to Remote Queues
- 7-4. Printcap for Chooser
- 7-5. Chooser Program Operation
- 7-6. Filter Template in Perl
- 7-7. Choosing A Destintation
- 7-8. Chooser Exit Codes
- 8-1. Evil (BAD) Way
- 8-2. Not So Evil Way
- 8-3. Add Options Using :append_z
- 8-4. Diabolically Fiendishly Clever Method
- 8-5. Using update_z
- 9-1. Hold Queues
- 9-2. All Hold Queues
- 9-3. Releasing Jobs for Printing
- 9-4. Releasing Jobs For Scheduled Print Run
- 9-5. Using Job Classes
- 9-6. Setting New Job Classes and Disabling Job Classes
- 9-7. Modifying Control File Using update_class
- 9-8. The update_class Filter
- 10-1. Using :bk (Berkeley Kompatible) Flag
- 11-1. Templates in Printcaps
- 11-2. Using lpc client all
- 11-3. Master User Printcap File, No Local Spooling
- 11-4. Master User Printcap File, Local Spooling
- 11-5. Master User Printcap File, No Local Spooling
- 11-6. All In One
- 11-7. Printcap Path Configuration Information
- 11-8. Example of Returned Printcap Value
- 12-1. Starting Screen
- 12-2. Printcap Entry Selection
- 12-3. Add A Printer
- 12-4. Option Specification
- 12-5. Advanced Options
- 12-6. ifhp Options
- 12-7. Saving Printcap Entry
- 12-8. Checkpc Results
Preface
A good cookbook will provide the reader not only with a set of recipes that sound delicious but also with a set of instructions that will allow novices to experts to prepare them. Of course, there are cookbooks for novices, cookbooks for experts, and then the gastronmic encyclopedias.
These Recipes for Printing are a collection of old favorites, not of the author, but of the hundreds of users of LPRng and other print spooling systems. They are not a complete discussion of the printing haute cuisine, but deal more with the preparation of the Minnesota Hot Dish. As I find from personal experience, you need to make a casserole for a family dinner far more often than to prepare mijotée de lentilles au lardons, dos de poisson-chat rôti, au vinaigre d'herbes for that one-time special dinner.
The various test files, scripts and examples in this document are also in the LPRng distribution in the /LPRng-xxx/UTILS directory.
Enjoy! Bon Appetite!
1. Acknowledgements
I would like to thank all of the LPRng users who so relentlessly tried an incredible number of permutations and combinations printers, software, and networks, and whose requests for just one more feature led to the development of the LPRng software.
2. Conventions
Many examples will show commands run by ordinary or privleged users. The prompt character will indicate the user:
Recipes and major examples will be show as:
Figure 1. lpq status
    h110: {64} % lpq
    Printer: lp@h110
     Queue: no printable jobs in queue
     Status: job 'cfA711h110.private' removed at 17:11:43.919
     Filter_status: done at 17:11:43.823
Smaller sets of code or commands will be shown as:
3. Disclaimer
THIS DOCUMENTATION AND THE DESCRIBED SOFTWARE AND PROCEDURES IS PROVIDED BY THE AUTHORS "AS IS" AND ANY EXPRESS OR IMPLIED WARRANTIES, INCLUDING, BUT NOT LIMITED TO, THE IMPLIED WARRANTIES OF MERCHANTABILITY AND FITNESS FOR A PARTICULAR PURPOSE ARE DISCLAIMED. IN NO EVENT SHALL THE AUTHORS BE LIABLE FOR ANY DIRECT, INDIRECT, INCIDENTAL, SPECIAL, EXEMPLARY, OR CONSEQUENTIAL DAMAGES (INCLUDING, BUT NOT LIMITED TO, PROCUREMENT OF SUBSTITUTE GOODS OR SERVICES; LOSS OF USE, DATA, OR PROFITS; OR BUSINESS INTERRUPTION) HOWEVER CAUSED AND ON ANY THEORY OF LIABILITY, WHETHER IN CONTRACT, STRICT LIABILITY, OR TORT (INCLUDING NEGLIGENCE OR OTHERWISE) ARISING IN ANY WAY OUT OF THE USE OF THIS DOCUMENTATION, EVEN IF ADVISED OF THE POSSIBILITY OF SUCH DAMAGE.
Chapter 1. Introduction - The Basics and Variations
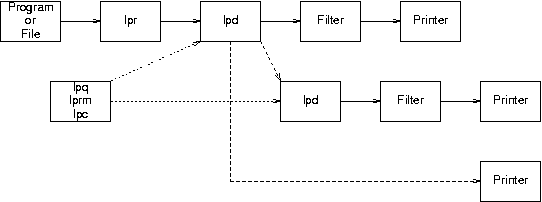
The LPRng print spooling system has the components shown in Figure 1-1. A program generates output and pipes it to the lpr application or the lpr application is used to print a file. The lpr application connects to the lpd print server over a network connection and then transfers the print job data and print options. The lpd server will store the job information Figure 1-2 in a spool directory and when the output device is available will transfer the job to the printing device.
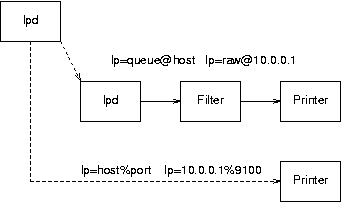
Since the print job may not be in the appropriate format for the ouput device a filter program may be used to prepare the output data or perform special operations on the output device. Alternatively, the print job can be forwarded to another print spooler Figure 1-1, transferred directly to a TCP/IP network port.
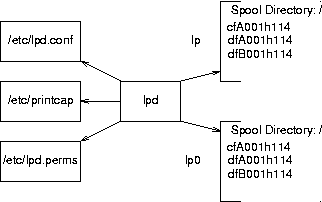
As shown in Figure 1-2, the LPRng print spooler uses the /etc/printcap, /etc/lpd.conf, and /etc/lpd.perms, files to get its operational parameters. The the /etc/printcap file defines a set of spool queues, each of which holds print jobs. The a print job consists of a control file (cfAnnnHHHHHHH) and one or more data files (dfAnnnHHHHHHH dfBnnnHHHHHHH, etc); the control file contains information such as the user name, file names, and printing options, while the data files contain the data to be printed.
Figure 1-3. Printcap
    # Common configuration information
    .common:sd=/var/spool/lpd/%P
      :sh:mx=0:force_localhost

    # forward to remote spooler
    lp:cm=Default Printer
     :tc=.common
     :lp=raw@10.0.0.1
           #  legacy - :rp=raw:rm=10.0.0.1

    # lp0 - open a device
    lp0|aliasforlp0:cm=Parallel Port Printer:\
      :tc=.common:lp=/dev/lpt0:

    # lp1 - open a network connection
    lp1:tc=.common:lp=10.0.0.14%9100

    # lp2 - run a program
    lp2:tc=.common:lp=|/usr/local/bin/smbprint
The /etc/printcap file format is very simple in appearance but complex in information. By convention, lines starting with # are comments; a printcap entry starts with the entry name followed by one or more aliases, followed by options.
The :tc option specifies a printcap entry for inclusion; there can be more than one entry and they are processed in order that they appear in the :tc list. The other options are processed after the :tc list; this means that the printcap options overide the ones from the :tc list. If a entry name starts with a period (.), then the LPRng system uses it only for :tc lists. This is similar to the use of hidden files, i.e. - files whose names start with a period are not displayed by the ls command.
Figure 1-4. lpd.conf Defaults File
    # Purpose: always print banner, ignore lpr -h option
    #   default ab@ (FLAG off)
    # Purpose: query accounting server when connected
    #   default achk@ (FLAG off)
    # Purpose: accounting at end (see also af, la, ar, as)
    #   default ae=jobend $H $n $P $k $b $t  (STRING)
    # Purpose: name of accounting file (see also la, ar)
    #   default af=acct  (STRING)

    # Purpose: use long job number (0 - 999999) when a job is submitted
    #   default longnumber@ (FLAG off)
    longnumber
The /etc/lpd.conf file can be used to override the set of default values for the print spooler or other printing applications. By the way, all of the LPRng options and their default values are defined in this file in the comments.
Figure 1-5. lpd.perm Permissions File
    ACCEPT SERVICE=C SERVER REMOTEUSER=root,papowell
    ACCEPT SERVICE=C LPC=lpd,status,printcap
    REJECT SERVICE=C
    ACCEPT SERVICE=M SAMEHOST SAMEUSER
    ACCEPT SERVICE=M SERVER REMOTEUSER=root
    REJECT SERVICE=M
    DEFAULT ACCEPT
The /etc/lpd.perms file (Figure 1-5) is used by lpd to determine who is allowed to perform various operations. The format of this file is modelled on that of a packet filter. When a request is made, the file is scanned for matches; each match sets a success or fail condition. The success or fail of the last match (or the last default value) will determine whether or not to perform the operation.

The LPRng client applications lpr, lprm, lpq, and lpc use the /etc/lpd.conf, /etc/printcap and ${HOME}/.printap files (if they exist) (Figure 1-6). The values in the ${HOME}/.printcap file are used to override the values in the /etc/printcap file, and the first printcap entry in the ${HOME}/.printap file becomes the default printer for the user (see Figure 1-7).
Figure 1-7. ${HOME}/.printcap Information
    # force your default printer
    #  - forces first entry to be lp_out
    lp_out:

    # send everything to your secret server
    *:lp=%P@secret_server:force_localhost@

    # combine the two above:
    lp|*:lp=%P@secret_server:force_localhost@

    # and of course, you can specify extra lpr options
    # for those special purpose printers and total abuse
    landscape:lpr= -Zlandscape -Plp
1.1. Checking the Printing System
Figure 1-8. Using checkpc
    h110: {1} % su
    Password:
    h110# checkpc
    h110# checkpd -V
    LPRng-3.7.10, Copyright 1988-2001 Patrick Powell, <papowell@lprng.com>
    Checking for configuration files '/etc/lpd.conf'
      found '/etc/lpd.conf', mod 0100644
    Checking for printcap files '/etc/printcap'
      found '/etc/printcap', mod 0100644
     DaemonUID 1, DaemonGID 1
    Using Config file '/etc/lpd.conf'
    LPD lockfile '/var/run/lpd.515'
    ...
    Checking printer 'lp'
     Checking directory: '/var/spool/lpd/lp'
       directory '/var'
       directory '/var/spool'
       directory '/var/spool/lpd'
       directory '/var/spool/lpd/lp'
      checking 'control.lp' file
      checking 'status.lp' file
      checking 'status' file
      checking 'log' file
      checking 'acct' file
The checkpc utility will read and parse the printcap file. It will report a zillion errors if something is wrong.
1.2. Fixing the Problems
Figure 1-9. Using checkpc -f
    h110: {1} % checkpc
    Warning -  bad directory - /var/spool/lpd/lp
    Warning -   Printer_DYN 'lp' spool dir '/var/spool/lpd/lp' needs fixing
    Warning -  bad directory - /var/spool/lpd/lp0
    Warning -   Printer_DYN 'lp0' spool dir '/var/spool/lpd/lp0' needs fixing
    h110: {2} % su
    Password:
    h110# checkpc -f
    Warning -   changing ownership '/var/spool/lpd/lp' to 1/1
    Warning -   changing ownership '/var/spool/lpd/lp' to 1/1
    Warning -   changing ownership '/var/spool/lpd/lp0' to 1/1
    Warning -   changing ownership '/var/spool/lpd/lp0' to 1/1
    h110# exit
    h110: {3} % checkpc
    h110: {4} % checkpc
The checkpc -f (-f for fix) will make checkpc attempt create missing files, set permissions, and take basic corrective actions. If it fails, then you have probably a very bad /etc/printcap file.
Chapter 2. Simple Spooling
This section covers the basic facilities that you will probably encounter when trying to set up a print queue. We will start with a basic print queue and then run through the setup steps.
Figure 2-1. Basic Printcap Entry
    # Common configuration information
    .common:sd=/var/spool/lpd/%P
      :sh:mx=0:force_localhost
    lp:cm=Default Printer, Forward to remote
     :tc=.common
     :lp=raw@10.0.0.1

    # lp0 - open a device
    lp0:cm=Parallel Port Printer
      :tc=.common:lp=/dev/lpt0:
2.1. Setting Up The Print Queues
Figure 2-2. Run checkpc
    h110: {1} % checkpc
    Warning -  bad directory - /var/spool/lpd/lp
    Warning -   Printer_DYN 'lp' spool dir '/var/spool/lpd/lp' needs fixing
    Warning -  bad directory - /var/spool/lpd/lp0
    Warning -   Printer_DYN 'lp0' spool dir '/var/spool/lpd/lp0' needs fixing
    h110: {2} % su
    Password:
    h110# checkpc -f
    Warning -   changing ownership '/var/spool/lpd/lp' to 1/1
    Warning -   changing ownership '/var/spool/lpd/lp' to 1/1
    Warning -   changing ownership '/var/spool/lpd/lp0' to 1/1
    Warning -   changing ownership '/var/spool/lpd/lp0' to 1/1
    h110# exit
    h110: {3} % checkpc
    h110: {4} % checkpc
First, you run checkpc -f. This will tell you if something is wrong with the printcap.
Figure 2-3. Check for Running Server
    h110: {5} % lpc lpd
    Printer 'lp@localhost' - cannot open connection - Connection refused
    Make sure the remote host supports the LPD protocol
    h110: {6} % su
    Password:
    h110# lpd
    h110# lpc lpd
    lpd server pid 6418 on h110.private
    h110# exit
    exit
    h110: {7} % lpc lpd
    lpd server pid 6418 on h110.private
Next, you make sure the lpd server is running, and if it is not, then you restart it.
Figure 2-4. Run lpq
    h110: {373} % lpq -a
    Printer: lp@h110
     Queue: no printable jobs in queue
    Printer: lp0@h110
     Queue: no printable jobs in queue
You now make sure that you can get the print queue status.
Figure 2-5. Run lpc
    h110: {374} % lpc stop lp lp0
    Printer: lp@h110
    lp@h110.private: stopped
    Printer: lp0@h110
    lp0@h110.private: stopped
    h110: {375} % lpq -a
    Printer: lp@h110 (printing disabled)
     Queue: no printable jobs in queue
    Printer: lp0@h110 (printing disabled)
     Queue: no printable jobs in queue
Use lpc to disable printing.
Figure 2-6. Run lpr
    h110: {376} % echo hi >/tmp/hi
    h110: {377} % lpr /tmp/hi
    h110: {378} % lpq
    Printer: lp@h110 (printing disabled)
     Queue: 1 printable job
     Server: no server active
     Rank   Owner/ID          Class Job Files         Size Time
    1      papowell@h110+445    A   445 /tmp/hi          3 17:40:51
    h110: {379} % lpr -Plp0 /tmp/hi
    h110: {380} % lpq -Plp0
    Printer: lp0@h110 (printing disabled)
     Queue: 1 printable job
     Server: no server active
     Rank   Owner/ID          Class Job Files         Size Time
    1      papowell@h110+449    A   449 /tmp/hi          3 17:41:05
Now try spooling a job.
Figure 2-7. Run lprm
    h110: {381} % lprm
    Printer lp@h110:
      checking perms 'papowell@h110+445'
      dequeued 'papowell@h110+445'
    h110: {382} % lprm -Plp0
    Printer lp0@h110:
      checking perms 'papowell@h110+449'
      dequeued 'papowell@h110+449'
Now try removing a job.
Figure 2-8. Enable Printing
    h110: {383} % lpc enable lp lp0
    Printer: lp@h110
    lp@h110.private: enabled
    Printer: lp0@h110
    lp0@h110.private: enabled
Finally, enable printing.
2.2. Diagnostics for Spooling Problems
Figure 2-9. Using lpr -V
    h110: {388} % lpr -V /tmp/hi
    LPRng-3.7.10, Copyright 1988-2001 Patrick Powell, <papowell@lprng.com>
    sending job 'papowell@h110+29' to lp@localhost
    connecting to 'localhost', attempt 1
    connected to 'localhost'
    requesting printer lp@localhost
    sending control file 'cfA029h110.private' to lp@localhost
    completed sending 'cfA029h110.private' to lp@localhost
    sending data file 'dfA029h110.private' to lp@localhost
    completed sending 'dfA029h110.private' to lp@localhost
    done job 'papowell@h110+29' transfer to lp@localhost
The first line of defense is to see what is happening when you try to spool a job. The lpr -V (-V for Verbose) will show a simple high level trace.
Figure 2-10. The lpr Options
    h110: {389} % lpr -=
    lpr: Illegal option '='
    Usage: lpr [-Pprinter[@host]] [-A] [-B] [-Cclass] [-Fformat] [-G] [-Jinfo]
       [-(K|#)copies] [-Q] [-Raccountname]  [-Ttitle]  [-Uuser[@host]] [-V]
       [-Zoptions] [-b] [-m mailaddr] [-h] [-i indent] [-l] [-w width ] [-r]
       [-Ddebugopt ] [--] [ filenames ...  ]
     -A          - use authentication specified by AUTH environment variable
     -B          - filter files and reduce job to single file before sending
     -C class    - job class
     -D debugopt - debugging flags
     -F format   - job format
       -b,-l        - binary or literal format
        c,d,f,g,l,m,p,t,v are also format options
     -G          - filter individual job files before sending
     -J info     - banner and job information
     -K copies, -# copies   - number of copies
     -P printer[@host] - printer on host
     -Q          - put 'queuename' in control file
     -Raccntname - accounting information
     -T title    - title for 'pr' (-p) formatting
     -U username - override user name (restricted)
     -V          - Verbose information during spooling
     -X path     - user specified filter for job files
     -Y          - connect and send to TCP/IP port (direct mode)
     -Z options  - options to pass to filter
     -h          - no header or banner page
     -i indent   - indentation
     -k          - do not use tempfile when sending to server
     -m mailaddr - mail final status to mailaddr
     -r          - remove files after spooling
     -w width    - width to use
     --          - end of options, files follow
     filename '-'  reads from STDIN
     PRINTER, LPDEST, NPRINTER, NGPRINTER environment variables set default printer.
    LPRng-3.7.10, Copyright 1988-2001 Patrick Powell, <papowell@lprng.com>
Use the -= option to see the available options.
Figure 2-11. Debug Options
    h110: {392} % lpr -D=
    debug usage: -D [ num | flag=num | flag=str | flag | flag@ | flag+N ]*
      flags recognized: network[+N,@], database[+N,@], lpr[+N,@],
       lpc[+N,@], lprm[+N,@], lpq[+N,@], log[+N,@],
       test=num
The -D= option shows the debugging flags available.
Figure 2-12. The lpr -D1 Output
    h110: {395} % lpr -D1 /tmp/hi >&/tmp/x
    2001-10-18-05:29:05 [8052]  Initialize: /dev/null fd 3
    2001-10-18-05:29:05 [8052]  initsetproctitle: using builtin
    2001-10-18-05:29:05 [8052] lpr  Setup_uid: OriginalEUID 0, OriginalRUID 1001
    2001-10-18-05:29:05 [8052] lpr  Setup_uid: OriginalEGID 1001, OriginalRGID 1001
    2001-10-18-05:29:05.761 [8052] lpr  Setup_configuration: starting, Allow_getenv 0
    2001-10-18-05:29:05.761 [8052] lpr  Setup_configuration: Configuration file '/etc/lpd.conf'
    2001-10-18-05:29:05.761 [8052] lpr  Setup_configuration: Require_configfiles_DYN '1'
    2001-10-18-05:29:05.761 [8052] lpr  Get_config: required '1', '/etc/lpd.conf'
    2001-10-18-05:29:05.762 h110 [8052] lpr
       Get_local_host: ShortHost_FQDN=h110, FQDNHost_FQDN=h110.private
    2001-10-18-05:29:05.763 h110 [8052] lpr
       Is_server 0, DaemonUID 1, DaemonGID 1, UID 0, EUID 0, GID 1001, EGID 1001
    2001-10-18-05:29:05.763 h110 [8052] lpr
       Setup_configuration: Host 'h110.private', ShortHost 'h110', user 'papowell'
    ...
The lpr -D1 (diagnostic level 1) shows a summary of the various steps taken to send the job. If you want more detail, try lpr -D2; or even lpr -D3;.
Figure 2-13. Using lpr -Dnetwork
    h110: {400} % lpr -Dnetwork /tmp/hi
    lp: getconnection: START host localhost, timeout 10, connection_type 1
    lp: getconnection: fqdn found localhost.my.domain, h_addr_list count 1
    lp: Link_dest_port_num: port 515 = 515
    lp: getconnection: AGAIN port 808, min 512, max 1023, count 0, connects 0
    lp: Link_dest_port_num: port 515 = 515
    lp: getconnection: sock 3, src ip 127.0.0.1, port 808
    lp: getconnection: dest ip 127.0.0.1, port 515
    lp: getconnection: connection to 'localhost' socket 3, errormsg 'No Error'
    lp: Link_send: host 'localhost' socket 3, timeout 6000
    lp: Link_send: str '^Blp
    ', count 4, ack 0xbfbfc3d0
    lp: Link_send: final status NO ERROR
    lp: Link_send: host 'localhost' socket 3, timeout 6000
    lp: Link_send: str '^B142 cfA065h110.private
    ', count 24, ack 0xbfbfbf90
    lp: Link_send: final status NO ERROR
    lp: Link_send: host 'localhost' socket 3, timeout 6000
    lp: Link_send: str 'Hh110.private
    Ppapowell
    J/tmp/hi
    CA
    Lpapowell
    Apapowell@h110+65
    D2001-10-18-05:34:18.939
    Qlp
    N/tmp/hi
    fdfA065h110.private
    UdfA065h110.private
    ', count 143, ack 0xbfbfbf90
    lp: Link_send: final status NO ERROR
    lp: Link_send: host 'localhost' socket 3, timeout 6000
    lp: Link_send: str '^C3 dfA065h110.private
    ', count 22, ack 0xbfbfbf24
    lp: Link_send: final status NO ERROR
    lp: Link_send: host 'localhost' socket 3, timeout 6000
    lp: Link_send: str '', count 1, ack 0xbfbfbf24
    lp: Link_send: final status NO ERROR
The lpr -Dnetwork (network diagnostic level 1) shows the network operations performed by lpr. If you want more detail, try lpr -Dnetwork+2 or even lpr -Dnetwork+3.
Figure 2-14. Debugging lpq
    h110: {1} % lpq -=
    lpq: Illegal option '='
    usage: lpq [-aAclV] [-Ddebuglevel] [-Pprinter] [-tsleeptime]
      -A           - use authentication specified by AUTH environment variable
      -a           - all printers
      -c           - clear screen before update
      -l           - increase (lengthen) detailed status information
                     additional l flags add more detail.
      -L           - maximum detailed status information
      -n linecount - linecount lines of detailed status information
      -Ddebuglevel - debug level
      -Pprinter    - specify printer
      -s           - short (summary) format
      -tsleeptime  - sleeptime between updates
      -V           - print version information

    h110: {2} % lpq -D1
    2001-10-18-05:39:09 [8090]  Initialize: /dev/null fd 3
    2001-10-18-05:39:09 [8090]  initsetproctitle: using builtin
    2001-10-18-05:39:09 [8090] lpq  Setup_uid: OriginalEUID 0, OriginalRUID 1001
    ...

    h110: {3} % lpq -Dnetwork
    lp: getconnection: START host localhost, timeout 10, connection_type 1
    lp: getconnection: fqdn found localhost.my.domain, h_addr_list count 1
    lp: Link_dest_port_num: port 515 = 515
    lp: getconnection: AGAIN port 862, min 512, max 1023, count 0, connects 0
    lp: Link_dest_port_num: port 515 = 515
    lp: getconnection: sock 3, src ip 127.0.0.1, port 862
    ...
The lpq, lprm, and lpc applications also support the -= and -D (debug) options.
2.3. What Went Wrong With My Job?
Figure 2-15. Basic lpq Information
    h110: {1} % lpr /tmp/hi
    h110: {1} % lpq
    Printer: lp@h110
     Queue: 1 printable job
     Server: pid 8741 active
     Unspooler: pid 8742 active
     Status: processing 'dfA740h110.private', size 3, format 'f',
        IF filter 'ifhp' at 08:16:58.465
     Filter_status: code = 10003, 'Warming Up' at 08:17:02.045
     Rank   Owner/ID         Class Job Files      Size Time
    active papowell@h110+740  A    740 /tmp/hi       3 08:16:58
The first thing to do is check the status of your job with lpq. This will show the current jobs in the queue and lpd server. The Server value is the process that is responsible for sending jobs to the printer. It starts the Unspooler process that does the actual transfer to the remote system. Each time a job is processed a new Unspooler process is created. The Server process stays active until there is no further work to be done for the print queue.
Figure 2-16. Using the lpq -l Option
    h110: {2} % lpq -l
    Printer: lp@h110
     Queue: 1 printable job
     Server: pid 8741 active
     Unspooler: pid 8742 active
     Status: printing job 'papowell@h110+740' at 08:16:58.465
     Status: processing 'dfA740h110.private', size 3, format 'f',
         IF filter 'ifhp' at 08:16:58.465
     Filter_status: getting end using 'pjl job/eoj' at 08:16:59.902
     Filter_status: code = 10003, 'Warming Up' at 08:17:02.045
     Rank   Owner/ID          Class Job Files      Size Time
    active papowell@h110+740  A     740 /tmp/hi       3 08:16:58
    h110: {3} % lpq -lll
    Printer: lp@h110
     Queue: 1 printable job
     Server: pid 8741 active
     Unspooler: pid 8742 active
     Status: accounting at start at 08:16:58.455
     Status: opening device 'h14%9100' at 08:16:58.455
     Status: printing job 'papowell@h110+740' at 08:16:58.465
     Status: processing 'dfA740h110.private', size 3, format 'f',
         IF filter 'ifhp' at 08:16:58.465
     Filter_status: data sent at 08:16:59.902
     Filter_status: sent job file at 08:16:59.902
     Filter_status: getting end using 'pjl job/eoj' at 08:16:59.902
     Filter_status: code = 10003, 'Warming Up' at 08:17:02.045
     Rank   Owner/ID          Class Job Files      Size Time
    active papowell@h110+740  A     740 /tmp/hi       3 08:16:58
The lpq -l (longer) option increases the number of Status and Filter_status lines shown. These lines come from the status.%P and status files in the spool queue. Adding more -l options increases the amount of status shown.
Figure 2-17. Using the lpq -L Option
    h110: {4} % lpq -L
    Printer: lp@h110
     Queue: 1 printable job
     Server: pid 8741 active
     Unspooler: pid 8742 active
     Status: waiting for subserver to exit at 08:16:58.451
     Status: subserver pid 8742 starting at 08:16:58.455
     Status: accounting at start at 08:16:58.455
     Status: opening device 'h14%9100' at 08:16:58.455
     Status: printing job 'papowell@h110+740' at 08:16:58.465
     Status: processing 'dfA740h110.private', size 3, format 'f',
         IF filter 'ifhp' at 08:16:58.465
     .....

     Filter_status: decoded job type 'PCL' at 08:16:59.901
     Filter_status: job type 'PCL' at 08:16:59.901
     Filter_status: transferring 3 bytes at 08:16:59.902
     Filter_status: 100 percent done at 08:16:59.902
     Filter_status: data sent at 08:16:59.902
     Filter_status: sent job file at 08:16:59.902
     Filter_status: getting end using 'pjl job/eoj' at 08:16:59.902
     Filter_status: code = 10003, 'Warming Up' at 08:17:02.045
     .....

     Rank   Owner/ID          Class Job Files     Size Time
    active papowell@h110+740    A   740 /tmp/hi      3 08:16:58
If you want to see LOTS of status, use lpq -L, which shows all the avilable status information.
Figure 2-18. Job Completion
    h110: {5} % lpq
    Printer: lp@h110
     Queue: no printable jobs in queue
     Status: job 'cfA740h110.private' removed at 08:18:07.776
     Filter_status: done at 08:18:07.756
    h110: {6} % lpq -lll
    Printer: lp@h110
     Queue: no printable jobs in queue
     Status: printing job 'papowell@h110+740' at 08:16:58.465
     Status: processing 'dfA740h110.private', size 3, format 'f',
         IF filter 'ifhp' at 08:16:58.465
     Status: IF filter 'ifhp' filter finished at 08:18:07.757
     Status: printing finished at 08:18:07.757
     Status: accounting at end at 08:18:07.774
     Status: finished 'papowell@h110+740', status 'JSUCC' at 08:18:07.774
     Status: subserver pid 8742 exit status 'JSUCC' at 08:18:07.775
     Status: lp@h110.private: job 'cfA740h110.private' printed at 08:18:07.775
     Status: job 'cfA740h110.private' removed at 08:18:07.776
     Filter_status: transferring 3 bytes at 08:16:59.902
     Filter_status: 100 percent done at 08:16:59.902
     Filter_status: data sent at 08:16:59.902
     Filter_status: sent job file at 08:16:59.902
     Filter_status: getting end using 'pjl job/eoj' at 08:16:59.902
     Filter_status: code = 10003, 'Warming Up' at 08:17:02.045
     Filter_status: end of job detected at 08:18:06.457
     Filter_status: pagecounter 105341 after 1 attempts at 08:18:07.756
     Filter_status: pagecounter 105341, pages 1 at 08:18:07.756
     Filter_status: done at 08:18:07.756
When your job is finished, you can use the lpq -lll options to see the final results of processing the job.
Figure 2-19. Summary Status Displays
    h110: {7} % lpq -s
    lp@h110 0 jobs
    h110: {239} % lpq -s -a
    lp@h110 0 jobs
    lp0@h110 0 jobs (printing disabled)
    h110: {8} % lpc status
     Printer    Printing Spooling Jobs  Server Subserver Redirect Status/(Debug)
    lp@h110      enabled  enabled    0    none    none
    h110: {9} % lpc status all
     Printer    Printing Spooling Jobs  Server Subserver Redirect Status/(Debug)
    lp@h110      enabled  enabled    0    none    none
    lp0@h110    disabled  enabled    0    none    none
    h110: {10} % exit
The lpq -s (short status) shows a single summary line for status. Adding the -a (all queues) will print information for all the print queues.
The lpc status command queries the lpd server and reports the status of the queues operated by the lpd server. The lpd status all will show the status of all the print queues.
2.4. Diagnostics for lpd Problems
Figure 2-20. lpd Options
    h110# lpd -=
    lpd: Illegal option '='
    usage: lpd [-FV] [-D dbg] [-L log]
     Options
     -D dbg      - set debug level and flags
                     Example: -D10,remote=5
                     set debug level to 10, remote flag = 5
     -F          - run in foreground, log to STDERR
                   Example: -D10,remote=5
     -L logfile  - append log information to logfile
     -V          - show version info
    h110# lpd -D=
    debug usage: -D [ num | flag=num | flag=str | flag | flag@ | flag+N ]*
      flags recognized: network[+N,@], database[+N,@], lpr[+N,@],
       lpc[+N,@], lprm[+N,@], lpq[+N,@], log[+N,@],
       test=num
The lpd server can be started in debug mode. However, the amount of information produced can be overwhelming. If you need to determine what is happening during initial connection, then you will have to do this.
Figure 2-21. Using lpd Debug Options
    h110# lpd
    h110# lpd -F -D1
    2001-10-18-05:56:55 [8156] lpd  Initialize: starting
    ...
    2001-10-18-05:56:55.228 h110 [8156] lpd  lpd: listening socket fd -6
    Fatal error - Another print spooler is using TCP printer
        port, possibly lpd process '8154'
    2001-10-18-05:56:55.228 h110 [8156] lpd  cleanup: done, exit(1)
    h110# killall lpd
    h110# lpd -F -D1
    2001-10-18-05:57:05 [8158] lpd  Initialize: starting
    ...
    2001-10-18-05:57:05.800 h110 [8159] Waiting  lpd: LOOP START
    2001-10-18-05:57:05.800 h110 [8159] Waiting
          lpd: starting select timeout 'yes', 600 sec, max_socks 7

    ---- other window
         h110: {5} % lpr /tmp/hi
    ----

    2001-10-18-05:57:44.341 h110 [8159] Waiting
         lpd: select returned 1, error 'No Error'
    2001-10-18-05:57:44.342 h110 [8159] Waiting
         lpd: fd 5 readable
    2001-10-18-05:57:44.342 h110 [8159] Waiting  lpd: connection fd 8
    2001-10-18-05:57:44.351 h110 [8159] Waiting  Start_worker: fd 8

    2001-10-18-05:57:44.356 h110 [8171] RECV  lp: Fix_Rm_Rp_info: printer name 'lp'
    2001-10-18-05:57:44.356 h110 [8171] RECV  Reset_config: starting
    2001-10-18-05:57:44.361 h110 [8171] RECV
         lp: Select_pc_info: looking for 'lp', depth 0
    ...
This shows all of the information available about the printing operation. But it is jumbled all together. Usually you want to see just the information about a single spool queue.
Figure 2-22. Debugging Spool Queue
    Printcap:
      lp:sd=/var/spool/lpd/%P
        :db=DebugOptions
           db=1     - output to device level 1,
           db=lpc db=lpq db=lpr db=lprm
                    - incoming lpc, lpq, lpr, lprm operations

    Spool Queue:  /var/spool/lpd/lp
      Default Files - created by checkpc
        control.%P  - queue control (enable, disable...)
        acct        - accounting
        status      - filter status
        status.%P   - queue status
        log         - diagnostics
The checkpc program creates a standard set of files in each spool queue, including the log file. The :db=DebugOptions enables debugging output for the specified operation. Information is sent to the log file as soon as the print queue directory and debug flags for the spool queue are determined.
Figure 2-23. Setting Queue Debug Options
    h110# vi /etc/printcap
      set:
        lp:...
          :db=lpr
    h110# lpc reread
    lpd server pid 8200 on h110.private, sending SIGHUP
Edit the printcap. You can then use lpc reread to signal the lpd process to read the new /etc/printcap file.
Figure 2-24. log File
    2001-10-18-06:11:30.349 h110 [8216] RECV
       lp: Receive_job: debug 'lpr', Debug 0, DbgFlag 0x1000
    2001-10-18-06:11:30.349 h110 [8216] RECV
       lp: Receive_job: spooling_disabled 0
    2001-10-18-06:11:30.349 h110 [8216] RECV
       lp: Receive_job: sending 0 ACK for job transfer request
    2001-10-18-06:11:30.349 h110 [8216] RECV
       lp: Receive_job: from localhost.my.domain- getting file transfer line
    2001-10-18-06:11:30.349 h110 [8216] RECV
       lp: Receive_job: read from localhost.my.domain-
           status 0 read 23 bytes '^B131 cfA215h110.private'
You can now use the log file to see the individual queue operations. The size of the log file is determined by the max_log_file_size (default is 1000Kbytes); when the log file exceeds this it is truncted to 25% of its maximum length.
Chapter 3. Printers
Figure 3-1. Printer Types
    Printers:
      Cheap and Slow Ink Dispensers
      Not So Cheap Fast Printers
      Vintage Stuff On Sale
      Legacy Junk You Are Stuck With
Your office mate has just purchased a nice new $99 ink-jet printer and wants to use it on his office desktop. Your boss calls you in and tells you that the new PlattenPusher 5500 printer will arrive and it needs to be operational ASAP. And finally, you pick up a really good bargin on a used HP4mPlus laser printer, which all the folks on the LPRng mailing list recommend as the most reliable (and SLOW...) printer they ever used.
With your luck, probably all three happen on the same day. Welcome to the wonderful world of printers.
3.1. Interface
Figure 3-2. Interface Types
    Connection:
      Parallel port : write only (no status)
                      read/write (maybe you get status)
      Serial port:    read/write (status)
      Network:        serial port emulator
                      parallel port emulator
                      print spooler emulator
                      whacko interface
The type of interface on your printer is usually a function of the printer cost and speed. The low cost/low speed printers usually have a parallel port interface, while the higher cost/higher speed printers usually have both a parallel port and a network interface. Serial ports are usually found only on older model printers or those which have very special facilities.
3.2. Parallel Port

Some printers provide status information. In order to do this they need a bidirectional communications channel. The parallel port interface found on the original X86 PC/XT/ATX systems was write only. However, there were a couple of signals (OUT OF PAPER, ERROR, etc.) that provided status information to the computer system. By monitoring these signals the host computer could tell the user that there were problems with the printer. Fiendishly clever engineers discovered that they could use these signals to implement a bidirectional data channel over the parallel port. They could even put multiple devices (daisy chained) on the parallel port. Needless to say, of the hundreds of companies that used bidirectional parallel interfaces no two of them used the same method.
In a fit of desperation, the IEEE1284 standard (well, actually 3 standards) were developed to allow at least some sort of general consensus on how a bidirectional parallel port should work.
If you are interested in the details about Parallel Ports, see http://www.fapo.com/1284int.htm for a nice introduction, and the IEEE1394 Trade Association Home Page http://www.1394ta.com/ for pointers to other information.
The good news is that if your printer is IEEE1284 compliant, then it has a functional bidirectional interface that will return status and other information. The bad news, really bad news, and really really bad news is a) there is no software level API for using bidirectionality; b) the parallel IO drivers that exist differ from version to version; c) most of the time the status returned by the printer is useless anyways.
Given this set of problems I recommend that you:
-
Put only one device (your printer) on each parallel port.
-
Do not expect to get status information back from the printer.
As shown in Figure 1-1, the printcap entry for a parallel port (without a filter) is really simple. If your printer is offline or powered down, lpd will not be able to open the parallel port and you will see an endless list of error messages in the status file.
Figure 3-5. Loading Linux Parallel Port Driver
    [papowell@h112 papowell]$ su
    Password:
    [root@h112 papowell]# echo </dev/lp0
    [root@h112 papowell]# cd /proc/sys/dev/parport/
    [root@h112 parport]# ls default  parport0
    [root@h112 parport]# cd parport0
    [root@h112 parport0]# ls autoprobe  autoprobe0  autoprobe1  autoprobe2
       autoprobe3  base-addr  devices  dma  irq  modes  spintime
    [root@h112 parport0]# cat autoprobe
    CLASS:PRINTER; MODEL:DESKJET 670C;
    MANUFACTURER:HEWLETT-PACKARD;
    DESCRIPTION:Hewlett-Packard DeskJet 670C;
    COMMAND SET:MLC,PCL,PML;
The Linux system uses loadable module drivers for the parallel ports and newer releases support the IEEE1284 device probe functions. You can use the command shown in Figure 3-5 to load the modules; the echo </dev/lp0 command tries to open the device in read mode, and then exits after reading nothing... which might suggest that you cannot get status from the device. If you have the /proc system installed, then you can see what the IEEE1284 probe function returned.
Figure 3-6. Parallel Port Problems
    One Interrupt per Output Character
       - One Interrupt per Blocks of Characters (DMA)
       - Hope that DMA works
    May operate by polling
    Don't try to daisy chain devices
While you may think that you are getting a high throughput to the parallel port, in actual fact it may be very slow. In the worst case you will get a an interrupt for every character output. Even worse, sometimes the parallel port driver will spin block for a small period of time in the hopes that a character will be accepted by the printer so it can send another one. Finally, while many users have successfully daisy chained multiple devices, there is a resounding silence from them when asked about the success of simultaneous use of the devices.
To add insult to injury, some systems do not even support interrupts with their parallel port hardware. To do IO, they periodically poll the output device to see if it is ready to accept another character.
3.3. Network Ports
Most devices that support a network connection do so by either providing support for a print spooler interface (lpd) or by emulating a bidirectional connection to the printing device (socket or appsocket). If your printer provides status reporting, it is strongly recommended that you use the socket interface. This will allow you to monitor conditions reported by the printer.
Figure 3-8. Network Port Printcap
    lp:lp=10.0.0.14%9100
      :sd=/var/spool/lpd/%P

    lp2:lp=raw@10.0.0.14
      :sd=/var/spool/lpd/%P
      # legacy :rp:rm support
      # :rp=raw:rm=10.0.0.14
The printcap for a network printer is shown in Figure 3-8. You can use the :rp:rm options if you want.
Figure 3-9. Benefits of Network Port Printcap
    High Speed
    Low Error Rate (+ Error Detection)
    Long Distances
    Very low system overhead
Network port printing is effectively the highest speed. The TCP/IP protocol provides both flow control and error detection/correction. The printer and host system can be separated by quite large distances. Finally, the overhead of the TCP/IP connection is very low in terms of hardware and software.
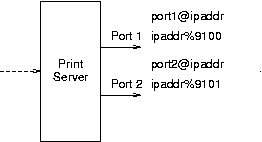
If you have legacy systems that have serial or parallel ports, you can buy a Network Print Server box. These have a network interface and one or more parallel or serial port interfaces.
Table 3-1. Network Print Server Configuration Information
| Manufacturer | Model | RFC1179 Port Name (rp=XXX) | Send to TCP port |
|---|---|---|---|
| Cannon Printer | Cannon 460 PS, no hard drive | xjdirect | - Unknown if supported - |
| Cannon 460 PS hard drive | xjprint - print immediately,xjhold - print later | - Unknown if supported - | |
| Digital Products Inc. | NETPrint Print Server | PORTn, where n is port on server | - Unknown if supported - |
| Electronics For Imaging Inc. | Fiery RIP i series | normalq or urgentq | - Unknown if supported - |
| Fiery RIP XJ series | xjprint | - Unknown if supported - | |
| Fiery RIP XJ+ and SI series | print_Model, e.g. print_DocuColor | - Unknown if supported - | |
| Fiery models ZX2100, ZX3300, X2, X2e | - Unknown if supported - | ||
| Emulex Corp. | NETJet/NETQue print server | PASSTHRU | - Unknown if supported - |
| Extended Systems Inc. | ExtendNet Print Server | Printern, where n is port on server | - Unknown if supported - |
| Hewlett-Packard | JetDirect interface card | raw | 9100 |
| Hewlett-Packard | JetDirect Multiport Server | port 1 - raw1, port 2 - raw2, etc. | port 1 - 9100, port 2 - 9101, etc. |
| I-Data | Easycom 10 Printserver | par1 (parallel port 1) | - Unknown if supported - |
| Easycom 100 Printserver | LPDPRT1 | - Unknown if supported - | |
| IBM | Network Printer 12, 17, 24, and 24PS | PASS | - Unknown if supported - |
| Lantronix | EPS1, EPS2 | EPS_X_S1 (serial) port 1, EPS_X_P1 (parallel) port 2, etc. | 3001 (port 1), 3002 (port 2), etc. |
| QMS | Various Models | RAW | 35 (AppSocket) |
| Tektronix | Tektronix printer network cards | PS (PostScript), PCL (PCL), or AUTO(Auto-selection between PS, PCL, or HPGL). Not reliable. | 9100 (AppSocket on some models) |
| Rose Electronics | Microserve Print Servers | lp | 9100 |
| Xerox | Models 4505, 4510, 4517, 4520 | PASSTHRU | 2501 (AppSocket on some models) |
| Model 4512 | PORT1 | 10001 (programmable) | |
| Model N17 | RAW | 9100 | |
| Models N24 and N32 | RAW | 2000 | |
| Models 4900, 4915, 4925, C55 | PS | 2000 | |
| Document Centre DC220/230 | lp | - Unknown if supported - |
All company, brand, and product names are properties of their respective owners.
3.4. Sending To SMB (Samba, Microsoft) Printer, Novell, Appletalk

There are a wide number of other print spooling systems that have been developed over the years. Most of these use proprietary or arcane protocols to transfer files. These include the SMB protocol used by Microsoft, the Novell print spooler support, and the Apple corporation Appletalk (Copyright, Trademarks where applicable). These systems usually run on or with non-UNIX Operating Systems or on proprietary hardware. But over the years packages have been developed to interface to these systems.
Figure 3-12. Protocols, Packages, and Transfer Programs
    Protocol        Package       Transfer Program
    SMB (CIFS)      Samba         smbclient + wrapper
       WWW: http://www.samba.org
    Novell Netware  ncpfs (Linux) nprint + wrapper
       FTP: ftp.gwdg.de/pub/linux/misc/ncpfs
       (Also Linux Kernel Documentation/filesystems)
    Appletalk       CAPS          pap + wrapper
       WWW: http://sourceforge.net/projects/netatalk
       WWW: http://www.umich.edu/~rsug/netatalk
Each of these programs will transfer a print job to a remote system.
Figure 3-13. Printcap For Transfer Programs
    lp:
      OR
      :lp=|/usr/local/lib/filters/smbprint
      OR
      :lp=|/usr/local/lib/filters/ncpprint
      OR
      :lp=|/usr/local/lib/filters/atalkprint
      # and the magic happens here
      :options=authfile="auth" host="h114" printer="lp" workgroup="ASTART"
      # See the LPRng/UTILS directory
You can specify a program to do the transfer to the remote host. The program will connect to the remote system and transfer STDIN to the printer. Errors will be written to STDERR and be put in the log by LPRng.
Figure 3-14. Samba smbclient Wrapper
    #!/bin/sh
    # configuration
    smbclient=/usr/local/bin/smbclient

    # get options from $PRINTCAP_ENTRY environment variable
    PATH=/bin:/usr/bin:/usr/local/bin
    options=`echo "${PRINTCAP_ENTRY}" | sed -n 's/:options=//p' `
    echo OPTIONS $options >&2
    if [ -n "$options" ] ; then
        # paranoia:  $options=`echo |perl -sp 's/[^\w\s,-+%="\']/ /'`
        eval dummy=v `echo $options`;
    fi

    if [ "$oldversion" != "" -a "$authfile" != "" -a -f "$authfile" ] ; then
        . $authfile;
        $authfile=
    fi

    if [ "$translate" = "yes" ]; then
     command="translate ; print -"
    else
     command="print -"
    fi

    echo $smbclient "$share" ${password:+password} -E \
     ${username:+-U} ${username:+username} ${hostip:+-I} \
     $hostip -N ${workgroup:+-W} $workgroup \
     ${authfile:+-A} $authfile -c "$command" >&2
    $smbclient "$share" ${password} -E \
     ${username:+-U} ${username} ${hostip:+-I} \
     $hostip -N ${workgroup:+-W} $workgroup \
     ${authfile:+-A} $authfile -c "$command" >&2
The smbprint script is run with the $PRINTCAP_ENTRY environment variable set to the printcap (See Figure 3-15). The value is scanned for the :options line and then this line is used with eval to set variables. This is a slight security risk and you should not have any metacharacters in the options field, so you can optionally strain them out or you can trust in your editting skills in the printcap.
Figure 3-15. $PRINTCAP_ENTRY
    lp:
      :lp=|/usr/local/lib/filters/smbprint
      :options=authfile="auth" host="h114" printer="lp" workgroup="ASTART"
There older versions of the smbclient required the user name and password on the command line. Unfortunately, the ps command would show the command line options, allowing users to see the password. Newer versions can read username and password from an authentication file. We can use either version by setting the oldversion option.
Finally, we echo the command for logging purposes (note that $password is not displayed and then run the smbclient command.
Figure 3-16. Novell and Appletalk Wrappers
    ncpprint:
     ....
     usercmd=""
     if [ "$username" != "" ]; then
       if [ "$password" != "" ]; then
         usercmd="-U $username -P $password"
       else
         usercmd="-U $username -n"
       fi
     fi
     nprint=/usr/bin/nprint -S $server -q $printer \
        $usercmd -N - 2>/dev/null

    atalkprint:
     ...
     /usr/bin/pap -p "$username:$printer@$host"
This general template can also be used with the nprint command from the Novell Netware support package to send files to a Novel Netware printers and the pap command from the Netatalk package.
3.5. Serial Port

A serial line is usually bidirectional in operation, but there are very few printers that will return status information. The most notable exception to this are PostScript printers. If you use a serial port printer, it is absolutely essential that you implement flow control, and almost mandatory that you use hardware or RTS-CTS (Request To Send and Clear To Send) flow control. Finally, you need to have the serial line operate in RAW mode, so that the serial line driver does not abuse the output stream by introducing extraneous CR-LF sequences, and changing control characters such as ESC (Escape) into ^E sequences.
Figure 3-18. Serial Port Printcap
    lp:lp=/dev/tty00
      :stty=raw crtscts 19200
      :sd=/var/spool/lpd/%P
      # optional Open Read Write
      #:rw
The :stty=... option is used to set line characteristics and takes a subset of the stty application parameters. You need to set the line speed and mode. If you need to get status information back from the printer, you should add the :rw (Open Read-Write) flag.
As you might suspect, the serial port is limited by the line speed. In addition, it has a higher rate of errors than you might expect. Most printers that use a serial port are for legacy purposes or have low speed and low data transfer requirements.
Chapter 4. Printer Job Formats
Figure 4-1. Page Description Lanaguages
    Printer Input File Formats:

      Postscript (Level 1, 2, 3)
      PCL (PCL 5)
      Text (Really Legacy PCL)

      PJL
        Configuration Specification for Job
         - PostScript or PCL or HPGL or ...

      Magic Mystery Proprietary Format
Most printers will only print jobs that have a particular format. These formats are called Page Description Languages. The most common are PostScript, PCL, and HPGL.
Figure 4-2. How To Identify Print Formats
    Print Job Job Types
       Start of File           File Type

       %!                      PostScript - Level Unknown
       %!PS-Adobe-1.0          PostScript - Level 1.0
       %!PS-Adobe-2.0          PostScript - Level 2.0
       %!PS-Adobe-2.1          PostScript - Level 2.0
       %!PS-Adobe-3.0          PostScript - Level 2.0
       \033%-12345X@PJL        HP Printer Job Language data
       \033E\033               HP PCL printer data
       This ...                Text
The type of file can be identified by looking at the content near the start of the file. This is how the file program determines the type of file Figure 1-1.
Figure 4-3. Using the file Application
    h110: {1} % file *
    Makefile:          ASCII English text
    atalkprint:        Bourne shell script text executable
    logo.gif:          GIF image data, version 89a, 250 x 91,
    one.pcl:           HP PCL printer data
    one.ps:            PostScript document text conforming at level 3.0
    one.pjl:           HP Printer Job Language data
    rewindstdin:       ELF 32-bit LSB executable
    testpage-a4.fig:   FIG image text, version 3.1
    testpage-a4.ps:    PostScript document text conforming at level 2.0
    testpage.fig:      FIG image text, version 3.1
4.1. PostScript
Figure 4-4. One PostScript Page
    %!PS-Adobe-3.0
    %% one page (i.e. - a page with a 1 on it)
    %%/Times-Roman
    /Courier
    findfont 200 scalefont setfont
    72 300 moveto
    (1) show
    showpage


     -- from PostScript Reference Manual 1986
        Adobe (www.adobe.com)
This is an example of a PostScript File.
Figure 4-5. Generate One Page
    h110: {1} % echo 1 |groff -Tps >/tmp/one.ps
    h110: {2} % more /tmp/one.ps
    %!PS-Adobe-3.0
    %%Creator: groff version 1.16.1
    %%CreationDate: Thu Oct 18 12:48:45 2001
    %%DocumentNeededResources: font Times-Roman
    %%DocumentSuppliedResources: procset grops 1.16 1
    %%Pages: 1
    %%PageOrder: Ascend
    %%Orientation: Portrait
    %%EndComments
    %%BeginProlog
    %%BeginResource: procset grops 1.16 1
    /setpacking where{
    pop
    currentpacking
    true setpacking
    }if
    /grops 120 dict dup begin
    /SC 32 def
    /A/show load def
    /B{0 SC 3 -1 roll widthshow}bind def
The quick way to generate a test page is use groff. The groff -Tps outputs PostScript.
Figure 4-6. PostScript Document Structuring Conventions
    Specifies how a PostScript print job should be formatted
    Divides the job up into a  prolog and body
    The body contains pages
       - each page is in an individual section
       - each page is independant

    Various Levels - 3.0 with PostScript Level 3, etc.
Most document generation systems produce PostScript that meets the PostScript Document Structuring Convention. This allows you to massage PostScript Documents in several ways.
Figure 4-7. Tools for PostScript Document Manipulation
    GhostScript - format conversion
       WWW: http://www.ghostscript.com
    PSUtils  - utilities to massage PostScript by Angus Duggan
       FTP: ftp://ftp.dcs.ed.ac.uk/pub/ajcd/
       WWW: http://www.dcs.ed.ac.uk/home/ajcd/psutils/
    psbook            rearranges pages into signatures
    psselect          selects pages and page ranges
    pstops            performs general page rearrangement and selection
    psnup             put multiple pages per physical sheet of paper
    psresize          alter document paper size
    epsffit           fits an EPSF file to a given bounding box
    getafm     (sh)   outputs PostScript to retrieve AFM file from printer
    showchar   (sh)   outputs PostScript to draw a character with metric info
    fixdlsrps  (perl) filter to fix DviLaser/PS output so that PSUtils works
    fixfmps    (perl) filter to fix framemaker documents so that psselect etc. work
    fixmacps   (perl) filter to fix Macintosh documents with saner version of md
    fixpsditps (perl) filter to fix Transcript psdit documents to work with PSUtils
    fixpspps   (perl) filter to fix PSPrint PostScript so that psselect etc. work
    fixscribeps (perl) filter to fix Scribe PostScript so that psselect etc. work
    fixtpps    (perl) filter to fix Troff Tpscript documents
    fixwfwps   (perl) filter to fix Word for Windows documents for PSUtils
    fixwpps    (perl) filter to fix WordPerfect documents for PSUtils
    fixwwps    (perl) filter to fix Windows Write documents for PSUtils
    extractres (perl) filter to extract resources from PostScript files
    includeres (perl) filter to include resources into PostScript files
    psmerge    (perl) hack script to merge multiple PostScript files
The combination of GhostScript and PSutils by Angus Duggan are a powerful combination.
Figure 4-8. Selection of Pages + 4up Printing
    h110: {81} % psselect -p20-24 LPRng-HOWTO.ps | psnup -4 >p4up.ps
    [20] [21] [22] [23] [24] Wrote 5 pages, 38404 bytes
    [1] [2] Wrote 2 pages, 42769 bytes

Figure 4-10. End Of PostScript Job: ^D (CTRL-D)
    ^D is recognized as an 'end of job'
       - causes reset of PostScript interpreter to defaults

    ^D%!PS-Adobe-3.0
    ...
    ^D

    The Dreaded ^D at Start of Job - causes problems
      Rest of job may be ignored!
      Solution: strip off ^D at start
        (ifhp = ps_eoj_at_start@)

    The Dreaded ^D at End of Job - causes problems when
      you are trying to massage postscript or append jobs
      Solution: strip off ^D everywhere
        (ifhp = ps_eoj_at_end@)
The ^D (CTRL-D) character is evil - it usually should not be put into raw files.
4.2. PCL
Figure 4-11. One PCL Page
    ^[E^[&u600D^[&l2A^[&l0O^[&l0E^[(0N^[(s1p0s0b4101T
      ^[(s24V^[*p655x942Y1^L^[E

    Note: ^[ is ESC or \033
          ^[E is 'reset printer configuration'
This is an example of a PCL file. Note that the file starts with ^[E, or the reset configuration string. All PCL jobs should start with this so that the previous job does not cause a problem.
Figure 4-12. Generate One Page
    h110: {1} % echo 1 | groff -Tlj4 >/tmp/one.pcl
    h110: {2} % more
    ^[E^[&u600D^[&l2A^[&l0O^[&l0E^[(0N^[(s1p0s0b4101T
      ^[(s24V^[*p655x942Y1^L^[E
The quick way to generate a test page is use groff. The groff -Tlj4 outputs PCL level 5. Again, watch out for the evil ^D (CTRL-D) characters.
4.3. Printer Job Language (PJL) and PostScript, PCL
Figure 4-13. PJL Example
    ^[%-12345X@PJL
    @PJL RDYMSG DISPLAY = ":"
    @PJL USTATUSOFF
    @PJL USTATUS JOB = ON
    @PJL USTATUS DEVICE = ON
    @PJL USTATUS PAGE = ON
    @PJL USTATUS TIMED = 10
    @PJL ENTER LANGUAGE = POSTSCRIPT
    ^D%!
    %!PS-Adobe-3.0
    %% one page (i.e. - a page with a 1 on it)
    %%/Times-Roman
    /Courier
    findfont 200 scalefont setfont
    72 300 moveto
    (1) show
    showpage
    ^D^[%-12345X@PJL
    @PJL RDYMSG DISPLAY = ":"
    @PJL EOJ NAME = ":"
    @PJL USTATUSOFF
    @PJL USTATUS JOB = ON
    @PJL USTATUS DEVICE = ON
    @PJL USTATUS PAGE = ON
    @PJL USTATUS TIMED = 10
    @PJL RDYMSG DISPLAY = "Done: :"
    ^[%-12345X
Printer Job Language is used to set up configuration and other facilities for a printer. It can establish defaults for printing and provide direction to the printer on how to handle job items not specified by the PostScript or PCL language.
The PJL Reset command ^[%-12345X performs a Print Job lanaguage independent reset. This allows PJL to be used with PostScript or PCL.
4.4. Text Files
Figure 4-14. Text Files and The Jaggies
    Text
      - usually ASCII characters

    The Dreaded Jaggies

    File:

       This is what you
       see on the printer

    Printer output:

       This is what you
                       see on the printer
Text is usually just ASCII characters. Unix lines are terminated with new line (NL or \012, and when sent to a printer result in The Jaggies. You need to have carriage returns (CR or \015 added to the file. You need to fix this by one of several methods.
4.5. Magical Mystery Proprietary Format
Figure 4-16. Magical Mystery Formats
    Magical Mystery Proprietary Format
      -  Usually a RASTER format

      -  legacy devices such as Versatek Plotters

      -  new super cheap InkJet Printers
         The host system needs to do conversion to raster file
      -  Dirty Little Secret - some of these understand PCL Level 5
         (monochrome) and are compatible with HP LaserJet 4.
You should try and see if your printer understands PCL. Try using GhostScript with the hpdj, ljet3 or ljet4.
Figure 4-17. GhostScript To The Rescue
    h110: {64} % gs --help
    AFPL Ghostscript 6.50 (2000-12-02)
    Copyright (C) 2000 Aladdin Enterprises, Menlo Park, CA.  All rights reserved.
    Usage: gs [switches] [file1.ps file2.ps ...]
    Most frequently used switches: (you can use # in place of =)
     -dNOPAUSE           no pause after page   | -q       `quiet', fewer messages
     -g<width>x<height>  page size in pixels   | -r<res>  pixels/inch resolution
     -sDEVICE=<devname>  select device         | -dBATCH  exit after last file
     -sOutputFile=<file> select output file: - for stdout, |command for pipe,
                                             embed %d or %ld for page #
    Input formats: PostScript PostScriptLevel1 PostScriptLevel2 PDF
You can read PostScript level 1, 2, or PDF with this version of GhostScript.
Figure 4-18. GhostScript Devices
    Available devices:
       x11 bbox x11alpha x11cmyk x11cmyk2 x11cmyk4 x11cmyk8 x11gray2 x11gray4
       x11mono x11rg16x x11rg32x atx23 atx24 atx38 deskjet djet500 fs600
       laserjet ljetplus ljet2p ljet3 ljet3d ljet4 ljet4d lp2563 oce9050 lj5mono
       lj5gray epswrite pswrite pdfwrite pxlmono pxlcolor bit bitrgb bitcmyk
       bmpmono bmpgray bmpsep1 bmpsep8 bmp16 bmp256 bmp16m bmp32b cgmmono cgm8
       cgm24 jpeg jpeggray miff24 pcxmono pcxgray pcx16 pcx256 pcx24b pcxcmyk
       pcx2up pbm pbmraw pgm pgmraw pgnm pgnmraw ppm ppmraw pnm pnmraw pkm
       pkmraw pksm pksmraw plan9bm pngmono pnggray png16 png256 png16m psmono
       psgray psrgb faxg3 faxg32d faxg4 tiffcrle tiffg3 tiffg32d tiffg4 tifflzw
       tiffpack tiff12nc tiff24nc appledmp iwhi iwlo iwlq bj10e bj200 ccr
       cdeskjet cdjcolor cdjmono cdj500 cdj550 declj250 dnj650c lj4dith pj pjxl
       pjxl300 bjc600 bjc800 escp djet500c cljet5 cljet5pr cljet5c lj3100sw
       coslw2p coslwxl cp50 epson eps9mid eps9high ibmpro epsonc ap3250 st800
       stcolor uniprint lj250 paintjet pjetxl hl7x0 imagen jetp3852 lbp8 lips3
       lp8000 m8510 necp6 lq850 lxm5700m oki182 okiibm photoex sj48 t4693d2
       t4693d4 t4693d8 tek4696 cfax dfaxlow dfaxhigh cif inferno mgrmono
       mgrgray2 mgrgray4 mgrgray8 mgr4 mgr8 sgirgb sunhmono cdj850 hpdj pcl3
       hpdjplus hpdjportable hpdj310 hpdj320 hpdj340 hpdj400 hpdj500 hpdj500c
       hpdj510 hpdj520 hpdj540 hpdj550c hpdj560c hpdj600 hpdj660c hpdj670c
       hpdj680c hpdj690c hpdj850c hpdj855c hpdj870c hpdj890c hpdj1120c cdj970
       stp nullpage
GhostScript converts PostScript to a wide range of output device formats. The interesting ones are ljet4, lj5mono, hpdj, and so forth. These are Ink Jet printers with various strange behaviors.
Figure 4-19. GhostScript Support
    http://www.ghostscript.com
    http://www.cs.wisc.edu/~ghost
    http://www.cs.wisc.edu/~ghost/doc/printer.htm
    http://www.cs.wisc.edu/~ghost/doc/AFPL/devices.htm
The http://www.ghostscript.com site has links to just about everything concerned with GhostScript. the http://www.cs.wisc.edu/~ghost site mirrors much of this information. The printer.htm and devices.htm are good sources for information about printing.
4.6. Printing Test Pages
Figure 4-20. Printing Test Pages To Parallel Port
    #!/bin/sh
    for i in one.pcl one.pjl one.ps ; do
     cat $i >/dev/lp0
    done
The easiest way to print the test pages is to try them all. This is brutal, but you may need to do it at least once.
Figure 4-21. Using Netcat (nc)
    nc -  Netcat by Mudge
    http://www.avian.org/
    ftp://ftp.lprng.com/pub/LPRng/TOOLS/netcat
    #!/bin/sh
    for i in one.pcl one.pjl one.ps ; do
     nc -w10 10.0.0.14 9100  <$i
    done

    h110: {453} % sh -x /tmp/testnc
    + nc -w10 -v -v 10.0.0.14 9100
    h14.private [10.0.0.14] 9100 (jetdirect) open
    @PJL USTATUS DEVICE
    CODE=10003
    DISPLAY="02 WARMING UP"
    ONLINE=TRUE

    ...
    @PJL USTATUS TIMED
    CODE=10001
    DISPLAY="Done: papowell /"
    ONLINE=TRUE

    ^C
Netcat is a handy tool for testing network connections to a printer. You can also use it as a port mapper and find out what interesting ports are open on your print spooler box.
Chapter 5. Filters

A filter is responsible for converting the job data files to a format compatible with the printer, transfering the job to the printer, and monitoring for any problems.
Figure 5-2. Filter Specification in Printcap Entry
    # LPRng
    lp:
      :filter=/.../filter

    # Legacy BSD (LPRng is backwards compatible)
    lp:
      # file 'format' is lower case letter X, filter is
      # 'Xf' option value, default format is 'f' so default
      # filter is 'if'
      :if=/.../filter
      :hf=/.../filter
The legacy BSD printing system required you to specify a filter for all input types. LPRng uses :filter to specify a default filter. Much more in line with modern printing.
Figure 5-3. Specifying Job Datafile Format
    LPRng 'format' selection:

       h110: {295} % lpr -Fx /tmp/hi

    Legacy BSD 'format' selection:

    h110: {295} % lpr -x /tmp/hi

    Format 'b' (Binary) or 'l' (Literal)
     for 'Passthrough' Operation - format 'l' is used

    h110: {295} % lpr -l /tmp/hi
    h110: {295} % lpr -b /tmp/hi

    Control file example:
        Hh110.private
        J/tmp/hi
        Lpapowell
        N/tmp/hi
        fdfA383h110.private  <- first letter is format
        UdfA383h110.private
The lpr -Fx (Filter x) option allows you to specify the filter type. Which, of course, if you use the :filter option is ignored. The Binary or Literal (-b or -l requests Pass Through treatment from the filter. The filter is still used, but it is passed a special flag.
In the control file, lines starting with lower case letters specify a format and the data file to print with the format.
Figure 5-4. Filter Execution Environment
    lp:sd=/var/spool/lpd/%P
      :filter=/filter
      :lp=/dev/lp

    Execution:
      CWD is spool directory (/var/spool/lpd/lp)

    Environment:
      PATH=...               - from /etc/lpd.conf
      LD_LIBRARY_PATH=...    - from /etc/lpd.conf
      PRINTER=lp
      PRINTCAP_ENTRY=lp:        - printcap entry
        :sd=/var/spool/lpd/lp     with %P fixed up
        :filter=/filter
        :lp=/dev/lp
      CONTROL=Aroot@h110+383    - job control file
        CA
        D2001-10-19-06:40:59.968
        Hh110.private
        J/tmp/hi
        Lroot
        Proot
        Qlp
        N/tmp/hi
        fdfA383h110.private
        UdfA383h110.private
The PRINTCAP_PATH environment variable has new lines before every colon (:) so you can split it up easily in the filter. See Figure 3-14 for an example of this use. The CONTROL value is the job control file. The control file contains the job print request sent to lpd. The output device is opened Read-Write if the :rw flag is set and it is a real device. Also, if the output is a filter or network connection then then the output is Read-Write.
Figure 5-5. Command Line Options
    lp:sd=/var/spool/lpd/%P
      :filter=/filter
      :lp=/dev/lp

    /filter <dfA383h110.private >/dev/lp
         STDIN, STDOUT, STDERR to Filter_status

    -CA -D2001-10-19-06:40:59.968 -Hh110.private -J/tmp/hi -Lroot -Qlp
         From the control file

    -Plp -Ff
     Legacy and LPRng, -P printer, -F format

    -n root -h h110.private -f dfA383h110.private
       ...
     there are more lower case options than you want to think about
The filter command line options are really agressive due to history and feeping creaturism. All of the lines in the control file with a capital letter are passed as shown, the -F is used for the print job format, and the -c is set if the job format was l (Binary or Literal). The -f also is the name of the data file. STDIN is set to the data file and STDOUT to the output device or network connection. Just to make life interesting, the name of the accounting file (if it is specified in the printcap or if it has a default value) is passed as the last parameter.
Figure 5-6. Filter Exit Codes
    Exit Code                Action
    0 (JSUCC)                Successful, send filter output to printer
    1 (JFAIL)                Failed, retry later
    2 (JABORT)               Failed, do not retry, and Abort printing
    3 (JREMOVE)              Remove job
    4 (JHOLD)                Set job HOLD flag
The filter program exit codes can be used to control how the job is processed. The JSUCC (0) value is the normal successful exit code. The JFAIL (1) value is used to indicate some sort of temporary failure and the job should be retried again. The JABORT (2) is more serious, and indicates some system error. The job should not be retried and printing should stop. The JREMOVE (3) code simply removes the job. This is useful if the job is unprintable. Finally, the JHOLD sets the job HOLD flag. The job will not be released for printing until the lpc release command releases it.
Figure 5-7. Solid As A Rock Filter Operation
    Filter:
      - examines input format using file
      - decides if file format is compatible with printer
          if not, can run a conversion program to convert
          the output.
      - initializes printer by sending magic cookies to it
          magic cookies depend on particular device, model, etc.
      - transfers output to printer, optionally inserting various
          control codes, CR -> CR/LF
      - if printer can reports status, then gets status as it does
          the transfer operation.
      - after transferring job,  sends more magic cookies to tell
          printer that job is over
      - monitors printer for error status
      - exits with an appropriate error code telling exactly what
         problems (if any) were encountered.
This is what a real filter should do. Note that it appears to be obvious that you would need to do all this.
Figure 5-8. Solid As A Used Paper Coffee Filter Operation
    Filter:
     - Tosses job at GhostScript for conversion, sets
          GhostScript output to STDOUT
     - Returns GhostScript exit status
OK, I am being a bit harsh. But this is not too far from the truth. Most filter packages are somewhere between the two extremes.
5.1. Writing Your Own Filter
If you want to write your own filter you can start with the following simple examples. In practice you have two choices: Perl or sh. The first in a filter is to get the various environment and option values. We will write a simple filter that converts PostScript files into 4 up PostScript files.
Figure 5-9. Filter Template in perl
    #!/usr/bin/perl
    use Getopt::Std;
    my $debug = 0;    # always... sigh...
    my(%opt, @pc, %options);

    # get command line options
    getopts( 'A:B:C:D:E:F:G:H:I:J:K:L:M:N:O:P:Q:R:T:S:U:V:W:X:Y:Z:'
    . 'a:b:cd:e:f:g:h:i:j:k:l:m:n:o:p:q:r:t:s:u:v:w:x:y:z:', \%opt );
    while( @ARGV ){ $opt{acct} = pop @ARGV ; };

    # split up the PRINTCAP_ENTRY environment variable value
    @pc = split /\n\s*:/s, ($ENV{PRINTCAP_ENTRY} || "");
    shift @pc;  # throw way first entry field, printer name
    # set the options
    foreach (@pc){ # set the options values
        if( /^(.+)=(.*)/ ){ $options{$1} = $2;
        } elsif ( /^(.+)@/ ){ $options{$1} = 0;
        } else { $options{$_} = 1; }
    }

    if( $debug ){ # for those interested
        my $s = "";
        foreach my $v (sort keys %options ){ $s .= "$v='$options{$v}',"; }
        print STDERR "Printcap: '$s'\n"; $s="";
        foreach my $v (sort keys %opt){ $s .= "$v='$opt{$v}',"; }
        print STDERR "Args: '$s'\n";
    }
This example shows how to get the various environment variables and command line options and put them into handy hashes for easy access. You should note the special treatment of the -c option and the arguments at the end of the command line. The last argument is the name of the accounting file (if any).
Figure 5-10. How To Determine The Type of Job File
    my $file = `/usr/bin/file -`; # we find the file type
    chomp $file;
    print STDERR "File: '$file'\n" if $debug; # show the file type
    sysseek STDIN,0,0 or die "cannot seek STDIN - $!";      # rewind to start of file
    my $is_postscript = ($file =~ /PostScript/i);
    print STDERR "Postscript: '$is_postscript'\n" if $debug; # show the file type
    if( $is_postscript ){
        my $status = system "/usr/local/bin/psnup", "-4";
        if( $status ){
            print STDERR "psnup failed - $!\n";
            exit 1;
        }
        exit 0;
    }
    while( <STDIN> ){ print };
    exit 0;
To determine the file type we use the file application. This reads the first part of the input file and then writes out the determined file type on its STDOUT. We check to see if the file is a PostScript file and then run the psnup command. If it is not, then we simply write copy STDIN to STDOUT.
Figure 5-11. Printcap for Filter
    nup:force_localhost
      :filter=/usr/local/libexec/filters/nup
      :sd=/var/spool/lpd/%P
      :lp=lp@localhost

    (Don't forget to run checkpc!)
We set make a printcap entry. Note the use of force_localhost to make sure that the print jobs are sent to the right print queue! The filter output will then be sent to lp@localhost for final printing.
Figure 5-12. Using Filter With $debug=1
     Status: processing 'dfA946h110.private', size 145, format 'f',
          IF filter 'nup' at 07:27:30.938
     Status: IF filter 'nup' filter msg - 'Printcap: 'cm='Class Test Printer 1',....
     Status: IF filter 'nup' filter msg - 'Args: 'A='papowell@h110+946',C='A',....
     Status: IF filter 'nup' filter msg - 'File: 'standard input: PostScript document'
          at 07:27:30.938
     Status: IF filter 'nup' filter msg - 'Postscript: '1'' at 07:27:30.938
     Status: IF filter 'nup' filter msg - 'Wrote 0 pages, 1775 bytes' at 07:27:30.940
     Status: IF filter 'nup' filter finished at 07:27:30.941
     Status: sending job 'papowell@h110+946' to lp@localhost at 07:27:30.943
Figure 5-12 shows the status output when we set the $debug=1. This is recommended when you are testing your filters.
Figure 5-13. Using Filter With $debug=0
     Status: processing 'dfA021h110.private', size 145, format 'f',
       IF filter 'nup' at 07:38:22.416
     Status: IF filter 'nup' filter msg - 'Wrote 0 pages, 1775 bytes'
       at 07:38:22.472
     Status: IF filter 'nup' filter finished at 07:38:22.473
     Status: sending job 'papowell@h110+21' to t6@localhost at 07:38:22.475
Figure 5-13 shows the status output when we set the $debug=0. As you can see, it is less chatty and just as informative to most users.
5.2. The LPRng IFHP Filter
Figure 5-14. ifhp
    ifhp   (IFHP)
      part of the LPRng suite
      separate from LPRng
      not quite as strong as a brick,
        but better than a wet paper coffee filter.

      ifhp.conf contains printer configuration information
The ifhp filter is part of the LPRng family of programs. It is distributed separately because the release and update times did not orginally match. The ifhp filter is intended for use with the LPRng software and undergoes much of the same testing.
Figure 5-15. ifhp.conf Configuration Information
    ###   Supported Printers

    ### default - HP 4M Plus, PostScript, PJL, PCL, status, pagecount support
    ### apple - PostScript printer, text to PS conversion, status, pagecount support
    ### postscript - PostScript printer, text to PS conversion, status, pagecount support
    ### ps - PostScript printer, text to PS conversion, status, pagecount support
    ### pcl - PCL only printer, no status
    ### pcl_gs - HP Laserjet 4 PCL only printer, write only, no status
    ### hpiiisi - HP LaserJet III (PCL and PostScript Interpreter)
Each printer type has an entry in the ifhp.conf configuration file. For convenience these are put at the start of the file.
Figure 5-16. Default Printer Magic Cookies
    # magic cookie definitions
    [default]
    # printer capabilities
    pjl    # can do PJL
    pcl    # can do PCL 5
    ps     # can do PS
    text   # can do TEXT

    status  # returns status by default
    sync    # needs sync magic cookie sent
    ps_sync=
      serverdict begin 0 exitserver
      statusdict begin false setenginesync end
            # PostScript sync magic cookie definition

    # definition of available user options
    pjl_user_opts=[ ... simplex duplex ... ]

    # magic cookie strings for use when PJL, PostScript or PCL file
    pjl_duplex=@PJL SET DUPLEX = ON
    ps_duplex=   statusdict begin true setduplexmode false settumble end
    pcl_duplex=\033&l1S
Each printer has a configuration section where the printer capabilities are defined, the user options that are available are specified, and the magic cookies that need to be sent to the printer to have the operations happen are defined. The default entry species the set of defaults for all the printers.
Figure 5-17. PostScript Only Printer
    a2ps_converter= /usr/local/bin/a2ps \%s{a2ps_options}
    a2ps_options= -q -B -1 -M \%M{papersize} --borders=no -o-
    gzip_decompress = /usr/bin/gzip -c -d

    # model for 'apple', 'postscript' or 'ps'
    [ apple postscript ps ]
    pjl@
    pcl@
    ps
    text@
    file_output_match = [
      *postscript*       ps
      *text*             ps  \%s{a2ps_converter}
      *pdf*              ps  \%s{pdf2ps_converter}
      *gzip_compressed*  filter  \%s{gzip_decompress}
      ]

    # do {
    #   $file = (lc ` file - `) =~ s/[\s\n]/_/gs;
    #   foreach $line (@file_output_match) {
    #     last if globmatch( $file, $line->[0] );
    #   }
    #   if( $line->[2] ){
    #      run $file->[2] and convert input file to format
    #   }
    # } while $line and $line->[1] != "filter"
    # outfile file format is $line->[1]
Here is an example of a PostScript only printer. The pjl@ pcl@ and text@ entries turn off PJL, PCL, and TEXT for the printer.
The file_output_match entry is used to implement a simple conversion facility that will try to find a conversion from one file type to another. It is deliberately simple minded, on the grounds that if you have a special type that you need to do conversions for all the time then you better make sure you do it right.
Figure 5-18. Using the ifhp Filter
    Printcap:

    lp:sd=/var/spool/lpd/%P
      :filter=/usr/local/lib/filters/ifhp
      :lp=/dev/lp
      # a PostScript printer that does not return status
      :ifhp= model=ps,status@
The :ifhp= option is used to pass options to ifhp. You can also use ifhp -Toption as well. In this example we specify a PostScript printer that does not return status.
Figure 5-19. Example of ifhp Operation
    h110: {205} %  lpr /tmp/f.pdf
    h110: {205} %  lpq -L
     Filter_status: using model 'DEFAULT' at 09:36:36.475
     Filter_status: pagecount using 'pjl info pagecount' at 09:36:36.477
     Filter_status: setting up printer at 09:36:36.477
     Filter_status: getting sync using 'pjl echo' at 09:36:36.477
     Filter_status: sync done at 09:36:38.335
     Filter_status: pagecounter 105340 after 1 attempts at 09:36:38.349
     Filter_status: pagecounter 105340 at 09:36:38.349
     Filter_status: sending job file at 09:36:38.350
     Filter_status: starting transfer at 09:36:38.350
     Filter_status: file program = '/usr/bin/file -' at 09:36:38.350
     Filter_status: started FILE_UTIL- 'file' at 09:36:38.351
     Filter_status: file information = 'pdf_document,_version_1.2' at 09:36:38.415
     Filter_status: initial job type 'pdf_document,_version_1.2' at 09:36:38.415
     Filter_status: decoded job type 'POSTSCRIPT' at 09:36:38.415
     Filter_status: job type 'POSTSCRIPT', converter '/usr/local/bin/pdf2ps - -'
         at 09:36:38.415
     Filter_status: started CONVERTER- 'pdf2ps' at 09:36:38.416
     Filter_status: converter done, output 707742 bytes at 09:36:39.589
     Filter_status: transferring 707742 bytes at 09:36:39.590
     Filter_status: 26 percent done at 09:36:40.338
     Filter_status: 52 percent done at 09:36:41.082
     Filter_status: 78 percent done at 09:36:41.830
     Filter_status: data sent at 09:36:44.501
     Filter_status: sent job file at 09:36:44.501
     Filter_status: getting end using 'pjl job/eoj' at 09:36:44.501
     Filter_status: end of job detected at 09:43:50.268
     Filter_status: pagecounter 105359 after 1 attempts at 09:43:51.503
     Filter_status: pagecounter 105359, pages 19 at 09:43:51.504
     Filter_status: done at 09:43:51.504
As you can see the information produced by the ifhp filter is more than adequate for tracing its steps. You might want to try adding :ifhp=debug=1, :ifhp=debug=2, or even for the customary debugging information.
Figure 5-20. Using -Z to Pass Options to ifhp
    h110: {227} % lpr -Zlandscape,duplex,copies=3 /tmp/hi

    Standard ifhp Options:

    Paper/Media Selection:
      a3, a4, a5, ledger, legal, letter
      envelope, oversize, transparency
      mediaselect=N

    Input Selection:
     inlower, inupper, manual

    Output Selection:
      outlower, outupper

    Copies:
      copies=N

    Orientation:
      landscape, portrait

    Duplex:
      duplex, duplexshort, simplex, lduplex, sduplex
Job formatting options are passed to ifhp using the lpr -Z. These are put into the control file with the -Z option.
Figure 5-21. Testing ifhp Operations
    #!/bin/sh
    # sendhp.sh
    cp /dev/null /tmp/log
    cp /dev/null /tmp/out
    IP=10.0.0.14
    ifhp=/usr/libexec/filters/ifhp
    # $ifhp -Tdev=$IP%9100,trace,debug=4 </tmp/one.ps 2>&1 | tee /tmp/log
    # $ifhp -Tdev=$IP%9100,trace,debug=1,appsocket,status,pagecount,waitend </tmp/one.ps 2>&1 | tee /tmp/log
    # $ifhp -Tdev=$IP%9100,trace,debug=1,pagecount_poll=2 </tmp/one.ps 2>&1 | tee /tmp/log
    $ifhp -Tdev=/tmp/out,trace,model=hp5 </tmp/one.ps 2>&1 | tee /tmp/log

    h110: {475} % sh /tmp/sendhp.sh
    ifhp 06:48:04.430 [3438] main: using model 'hp5'
    ifhp 06:48:04.433 [3438] Process_job: setting up printer
    ifhp 06:48:04.433 [3438] Do_accounting: pagecounter 0
    ifhp 06:48:04.434 [3438] Process_job: sending job file
    ifhp 06:48:04.434 [3438] Send_job: starting transfer
    ifhp 06:48:04.434 [3438] Send_job: initial job type 'POSTSCRIPT'
    ifhp 06:48:04.434 [3438] Send_job: decoded job type 'POSTSCRIPT'
    ifhp 06:48:04.434 [3438] Send_job: job type 'POSTSCRIPT'
    ifhp 06:48:04.434 [3438] Send_job: transferring 145 bytes
    ifhp 06:48:04.434 [3438] Send_job: 100 percent done
    ifhp 06:48:04.434 [3438] Send_job: data sent
    ifhp 06:48:04.434 [3438] Process_job: sent job file
    ifhp 06:48:04.434 [3438] Do_accounting: pagecounter 0, pages 0
    ifhp 06:48:04.434 [3438] Process_job: done

    h110: {475} % more /tmp/out
    ^[%-12345X@PJL
    @PJL RDYMSG DISPLAY = ":"
    @PJL USTATUSOFF
    @PJL USTATUS JOB = ON
    ...
You can test ifhp and see what it does by using the -T command line option. This is equivalent to using the /etc/printcap ifhp option.
5.3. Taming the Wild Phaser Printer
There are several printers that have network interfaces but which require very special treatment. Among these printers are the Tektronics Phaser printers, some legacy Xerox printers, and some plotters. These devices require that the network connection be opened and closed multiple times when sending a job. In order to handle this we have the filter open the connection. This type of operations is called the appsocket protocol.
Figure 5-22. Phaser/Appsocket Support
    Printcap:
    lp:
      :lp=/dev/null
      :filter=/.../ifhp
      :ifhp=model=phaser  # OR
      :ifhp=appsocket,status,pagecount,waitend,dev=10.0.0.14%9100

    Offline Test:

    IP=10.0.0.14
    ifhp -Tdev=trace,debug=1,appsocket,status,pagecount,waitend,dev=10.0.0.14%9100
      </tmp/one.ps 2>&1 | tee /tmp/log
You need to specify the remote host and port to use to the ifhp filter, as well as the appsocket option. You should test this first using the offline test mode.
Chapter 6. Banner Pages and Accounting
Banner pages are usually a waste of paper unless you need to make sure that user jobs are separated clearly. Even then, unless banner pages are on different stock or color they are usually ignored and thrown away.
6.1. Suppressing Banner Pages
Most users do not want banner pages, as they are a waste of paper. Some printers, especially the HP family of printers, will generate a banner page when you send a job to them using the lpd protocol (i.e. lp=port@host.
Figure 6-1. Changing JetDirect Configuration
    h110: {492} % telnet 10.0.0.14
    Trying 10.0.0.14...
    Connected to h14.private.
    Escape character is '^]'.

    Please type [Return] two times, to initialize telnet configuration
    For HELP type "?"
    > ?

    ===JetDirect Telnet Configuration===

            Configured Parameters
            IP Address      : 10.0.0.14
            Subnet Mask     : 255.255.255.0
            Default Gateway : 10.0.0.1
            Syslog Server   : 0.0.0.0
            Idle Timeout    : 121 Seconds
            Banner          : 1
    > banner: 0
    > quit
Your first line of defense is to try to disable banner printing by the printer. This can be done (for HP Printers) as in Figure 6-1. Note that the user name and password are not set by default so effectively anybody can modify your printer configuration.
Figure 6-2. Printcap Option :sh and lpr -h (No Header) Option
    Printcap:
      lp: ... :sh

    Command line:
      h110: {838} % lpr -h /tmp/hi

    No 'L' line in control file
The banner printing is triggered by the L (Login name?) line in the control file. You can use the printcap :sh (suppress header pages or banner pages) or the command line lpr -h option to prevent lpr from putting this line into the control file.
Figure 6-3. Removing Banner Lines
    Printcap:
    lp:...
    :incoming_control_filter=/.../nobanner


    nobanner Script:

    #!/usr/bin/perl
    ...
    See Figure 5-9

      # read stdin
      my( $file );
      $file = join "", <STDIN>;
      $file =~ s/^L.*$//m;
      print $file;
      exit 0
6.2. Forcing Banner Pages
The :ab (always print a banner page) is used by the lpd server to force banner page generation. Even if the user tries to suppress it, it will still try to print a banner page.
6.3. Generating Banner Pages
Figure 6-5. Generating Banner Page
    lp:
      :of=/.../ifhp
      :bp=/.../banner.ps  # for banner at start
      # :be=/.../banner.ps  # for banner at end
      # :bs=/.../banner.ps  # for banner at start

    LPRng banner generators:
      /usr/local/libexec/filters/psbanner - PostScript
      /usr/local/libexec/filters/pclbanner - PCL
      /usr/local/libexec/filters/lpbanner - Text
If you want to have a banner page printed you need to have two additional lpd facilities in the printcap entry: a banner printing program (:bp=...) and a filter to handle banner printing (:of=...). The bp causes the banner to be put at the start of the job, the be at the end of the job (overrides bp), and you can use bs and be to have banners at both start and end of jobs.
The banner printing programs are run exactly as a normal filter program, and the output is used as the banner to be printed. The LPRng psbanner, pclbanner, and lpbanner programs can be modified for local use.
If your printer requires special setup or conditioning, then you will have to specify a filter for the banner program. Historically this is done using the of option. This filter is started, the banner page sent to it, and then the filter is suspended (don't ask), the job is printed, and then the filter is restarted. Finally, if a banner is needed at the end of the job it is generated and sent.
6.4. Accounting
For a detailed discussion of accounting, please consult the LPRng HOWTO documentation. We will briefly cover some simple recipes for disaster here.
Figure 6-6. Basic Accounting Information
    lp:
      :af=acct    # accounting file
        or
          :af=|/...       # filter to run
          :af=host%port   # remote server to query
      :as=jobstart $H $n $P $k $b $t   # line to print
      :as=/...    # filter to run at start of job
      :ae=jobend $H $n $P $k $b $t   # line to print
      :ae=/...    # filter to run at start of job

      :achk       # check to see if allowed to print
The :af entry specifies either a file, a network connection, or a program to run. If a file, then accounting information is written to the file; if a program, then the program is run; if a network connection then a TCP/IP connection is made to the specified host and port. The :as and :ae entries specify the format of the line to print or a program to run at the start and end of the job respectively.
Figure 6-7. Accounting File Information
    jobstart '-Hh110.private' '-npapowell' '-Pt1' '-kcfT456h110.private'
       '-b3' '-t2001-10-21-15:17:12.000'
    jobend '-Hh110.private' '-npapowell' '-Pt1' '-kcfT456h110.private'
        '-b3' '-t2001-10-21-15:17:
The accounting information provided by the lpd server is very basic and does not include page usage. However, we can have the print filters write information to the file as well.
Figure 6-8. Filter Accounting Information
    jobstart '-Hh110.private' '-nroot' '-Plp' '-kcfA129h110.private'
       '-b48780' '-t2001-10-19-09:36:36.000'
    filestart '-q26132' '-p105340' '-t2001-10-19-09:36:38.350'
        '-Aroot@h110+129' '-nroot' '-Plp'
    fileend '-b19' '-T435' '-q26132' '-p105359' '-t2001-10-19-09:43:51.504'
         '-Aroot@h110+129' '-nroot' '-Plp'
    jobend '-Hh110.private' '-nroot' '-Plp' '-kcfA129h110.private' '-b48780' '-t2001-10-19-09:43:51.000'
The filestart and fileend lines were written by the ifhp filter. The -p (pagecounter) values are the starting and ending values for the physical page counter on the printer. The -b value is the number of pages used and the -T the number of seconds used.
Remember that ifhp can only get accurate page counting information if there is a physical page counter and it can be accurately read. This requires a bidirectional network link. Parallel ports do not work. Also, your printer must support either PJL or PostScript, and have a hardware page counter. Finally, the page counter must be updated in a timely manner and reflect the number of pages used by each job.
The :achk checks to see if the user has permission to print. At the start of the job, if the accounting destination is a program or network connection, after writing the information lpd reads a line from program or connection. This line is used to determine if the user has permission to print. The return value can also cause the job to be held or deleted.
6.5. Accounting Gotchas
Figure 6-9. Accounting Gotchas
    jobstart '-Hh110.private' '-nroot' '-Plp' '-kcfA129h110.private'
       '-b48780' '-t2001-10-19-09:36:36.000'
    filestart '-q26132' '-p105340' '-t2001-10-19-09:36:38.350'
        '-Aroot@h110+129' '-nroot' '-Plp'
    jobstart '-Hh110.private' '-nroot' '-Plp' '-kcfA129h110.private'
       '-b49780' '-t2001-10-19-09:36:36.000'
    filestart '-q27992' '-p105340' '-t2001-10-19-09:36:38.350'
        '-Aroot@h110+129' '-nroot' '-Plp'
Observe the accounting file in Figure 7-1. Clearly something has happened. The clever student (ummm... user?) has killed off the printer just as his last page has come out. There is no usage line. You will have to calculate usage based on the differences between the pagecounters at the start of each job.
Of course, this can also be the result of a printer failure, bad print job, etc. etc. etc. Not to mention elves. Most student labs have lots of elves lurking in the background that cause endless headaches.
6.6. Accounting Including Banner Pages
The :of filter is used to print the banner pages. Now the information in the accounting file inclues the banner pages as well as the job pages.
Chapter 7. Printer Pools and Load Sharing
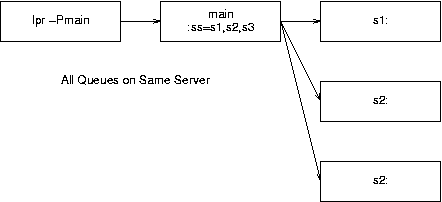
A printer pool does load sharing amoung a group of printers. When you send a job to the main spool queue the job is then sent to the next available printer. If all of the printers are busy then the job is held in the queue Figure 7-1.
Figure 7-2. Load Balancing Printcap
    main:
      :sd=/var/spool/lpd/%P:sv=sv1,sv2,sv3

    sv1:
      :sd=/var/spool/lpd/%P:ss=main:lp=...
    sv2:
      :sd=/var/spool/lpd/%P:ss=main:lp=...
    sv3:
      :sd=/var/spool/lpd/%P:ss=main:lp=...
The printcap for setting up spooling is shown in Figure 7-2. The :sv option marks this queue as the input queue for load balancing and the :ss option specifies that this queue is the destination for load balancing. The server queues must have an associated device and send the jobs to the associated device.
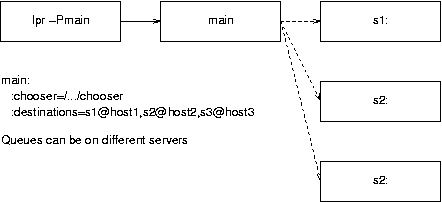
Figure 7-4. Printcap for Chooser
    main:
      # program to select destination
      :chooser=/.../chooser
      :destinations=s1@host1,s2@host2,s3@host3
      # You can even combine the two forms
      #  sv=...
The :chooser value is an executable program that is provided a list of destinations, by using the :destinations value in the $PRINTCAP_ENTRY. We will show how to use this in the next section.
7.1. Implementing Smart Load Balancing
Figure 7-5. Chooser Program Operation
    # In Perlish
    @list = PC('destination');  # get destination list
    foreach $printer (@list) {
        if( PrinterAvailable( $printer ){
            print $printer . "\n";
            last;
        }
    }
The PrinterAvailable function would determine the availability of the destination printer by an appropriate method - lpq query, testing to see if a connection can be made to the device, etc.
If you specify a :chooser for a :sv type of load balance queue, then the chooser program can also be used. Lets look at a simple chooser implementation.
Figure 7-6. Filter Template in Perl
    #!/usr/bin/perl
    use Getopt::Std;
    my $debug = 1;    # always... sigh...
    my(%opt, @pc, %options);

    # get command line options
    getopts( 'A:B:C:D:E:F:G:H:I:J:K:L:M:N:O:P:Q:R:T:S:U:V:W:X:Y:Z:'
    . 'a:b:cd:e:f:g:h:i:j:k:l:m:n:o:p:q:r:t:s:u:v:w:x:y:z:', \%opt );
    while( @ARGV ){ $opt{acct} = pop @ARGV ; };

    # split up the PRINTCAP_ENTRY environment variable value
    @pc = split /\n\s*:/s, ($ENV{PRINTCAP_ENTRY} || "");
    shift @pc;  # throw way first entry field, printer name
    # set the options
    foreach (@pc){ # set the options values
        if( /^(.+)=(.*)/ ){ $options{$1} = $2;
        } elsif ( /^(.+)@/ ){ $options{$1} = 0;
        } else { $options{$_} = 1; }
    }

    if( $debug ){ # for those interested
        my $s = "";
        foreach my $v (sort keys %options ){ $s .= "$v='$options{$v}',"; }
        print STDERR "Printcap: '$s'\n";
        $s="";
        foreach my $v (sort keys %opt){ $s .= "$v='$opt{$v}',"; }
        print STDERR "Args: '$s'\n";
    }
This is the standard filter template. We use this almost everywhere.
Figure 7-7. Choosing A Destintation
    my (@list, @destinations);
    if( $options{sv} ){ # if we have :sv then we read them from STDIN
        while( <STDIN> ){ chomp; push @destinations, $_; }
    } else { # else we use the 'destinations' printcap value
        @list = split /[,\s]+/, ($options{destinations} || "");
        # and we randomize - this is a bit of perl magic
        while( @list ){
            push @destinations,(splice @list,rand(@list),1);
        }
    }
    # and we split the destinations up...
    print STDERR "Destinations '@destinations'\n" if $debug;
    # and now we search
    my $lpq="/usr/bin/lpq";
    foreach ( @destinations ){
        my $status = "";
        next if not $_;
        # run the lpq
        eval { alarm(10); $status = `$lpq -s -P$_`; }; alarm(0);
        chomp $status;
        print STDERR "STATUS '$_' $status\n" if $debug;;
        # we reject queues that are not suitable
        next if( $status =~ /disabled/ or $status != / 0 jobs / );
        print STDERR "chose '$_' from @$destinations\n";
        print $_;
        last;
    }
We first get the list of destinations - from STDIN if we have helping an :sv load balance queue, or from the :destinations printcap entry. In the later case we randomize the list so that we spread the load over different printers rather than sending to the first printer in the list. We then run a command or application that gets the print queue status or whatever we need to decide if the printer is ready. Notice the timeouts. This is usually not necessary but you might run into this problem some day. We then look at the status and decide if we can use the printer.
If no printer is available then nothing is printed on STDOUT, and the lpd process will wait until either a printer becomes available or for a timeout specified by the :chooser_interval value (default 10 seconds) in the printcap entry or /etc/lpd.conf file.
7.2. Using :chooser Exit Codes
Figure 7-8. Chooser Exit Codes
    Exit Code                Action
    0 (JSUCC)                Use chooser output for destination
                             (No destination, retry later)
    1 (JFAIL)                Failed - retry later
                             (same as JSUCC, no destination)
    2 (JABORT)               Abort printing, wait for restart
    3 (JREMOVE)              Remove job
    4 (JHOLD)                Set job HOLD flag
The :chooser program exit codes can be used to control printing. The JHOLD and JREMOVE exit codes are job specific; they can be used to hold or remove a job.
Chapter 8. Wildcards, Bounce Queues, and Forwarding
One of the things you might want to do is have a set of queues that massage the various jobs and then send them to a destination printer.
Figure 8-1. Evil (BAD) Way
    landscape:force_localhost
      :ifhp=model=xx
      :filter=/.../convert_to_landscape | /.../ifhp
      :lp=10.0.0.14%9100

    portrait:force_localhost
      :ifhp=model=xx
      :filter=/.../convert_to_landscape | /.../ifhp
      :lp=10.0.0.14%9100

    lp:tc=.common
      :ifhp=model=xx
      :filter=/.../ifhp
      :lp=10.0.0.14%9100
Each queue will now fight for a connection to the destination printer.
8.1. Bounce Queues
Figure 8-2. Not So Evil Way
    landscape:tc=.common
      :filter=/.../convert_to_landscape
      :lp=lp@localhost

    portrait:tc=.common
      :filter=/.../convert_to_landscape
      :lp=lp@localhost

    lp:tc=.common
      :ifhp=model=xx
      :filter=/.../ifhp
      :lp=10.0.0.14%9100
You have various filters set up so that each queue does a conversion and then forwards it to the real printer for output. No fighting. This method is called bounce queues as the job bounces through the queues, getting modified at each stage.
8.2. Adding -Z Options Using Bounce Queues
Figure 8-3. Add Options Using :append_z
    landscape:tc=.common
      :append_z=landscape
      :lp=lp@localhost

    portrait:tc=.common
      :append_z=portrait
      :lp=lp@localhost

    # ifhp (or other) filter uses the -Z options
    lp:tc=.common
      :ifhp=model=xx
      :filter=/.../ifhp
      :lp=10.0.0.14%9100
Now you can add one option at a time. But what if you want to do landscape and duplex mode at the same time? You need to create a landscape_duplex queue. The combinations become very unweildy.
8.3. Adding Options By Modifying Control File
Figure 8-4. Diabolically Fiendishly Clever Method
    .common=force_localhost:sd=/var/spool/lpd/%P:sh:mx=0

    lp|lp_*  # we recognize lp_xxxx for this filter
      :tc=.common
      :incoming_control_filter=/.../update_z
      :ifhp=model=xx
      :filter=/.../ifhp
      :lp=10.0.0.14%9100

    -- for landscape:
    h110: {838} % lpr -Plp_landscape
       -> Control file:  Zlandscape

    -- for portrait
    h110: {838} % lpr -Plp_portrait
       -> Control file:  Zlandscape

    -- for landscape and duplex
    h110: {838} % lpr -Plp_landscape_duplex -Zother
       -> Control file:  Zother,landscape,duplex
You can use a wildcard in the printer name. The LPRng code will first try to match a printer name against the non-wildcard printer names. If this fails then it will look for the first match using a glob type of match.
When the job is received the name that was used to send the job will be put into the control file as the Q line and is passed as a -Q option to and filters. The :incoming_control_filter is passed the original control file on its STDIN and sends a modified version on STDOUT. This allows the control file to be modified as it is received.
One of the ways to modify the control file is to convert suffixes of the print queue name (i.e. - _option) to -Z option values and append these to the Z line of the control file.
Figure 8-5. Using update_z
    #!/usr/bin/perl
    ...
      See Figure 5-9

    # read stdin
    my( $file, $Zopts, $Q );
    $file = join "", <STDIN>;
    print STDERR "File '$file'\n" if $debug;

    # first use command line Queue name, then control file Q
    # then the printer name, then control file P
    $Q = $opt{Q}; ($Q) = $file =~ /^Q(.*)$/m if not $Q;
    # if no queue name fall back to printer name
    $Q = $opt{P} if not $Q; ($Q) = $file =~ /^P(.*)$/m if not $Q;
    $Q = "" if not $Q;  # stupid -w... sigh...

    # get Zopts
    ($Zopts) = $file =~ /^Z(.*)$/m;
    $Zopts = "" if not $Zopts; # stupid -w ... sigh ...

    print STDERR "Q '$Q', Zopts '$Zopts'\n" if $debug;

    # now we split up the name and use as parameters for Z options
    while( $Q =~ /_([^_]+)/g ){
        # you can simply append them:
        $Zopts .= ",$1";
        # or you can test and then append translated format
        # $Zopts .= $xlate{$1} if $late{$1}
    }
    $Zopts =~ s/^,//; # remove leading comma
    print "Final '$Zopts'\n" if $debug;
    if( $Zopts ){
        $file = "Z$Zopts\n" . $file if( not ($file =~ s/^Z.*$/Z$Zopts/m));
    }
    print $file;
    exit 0
The -Q option or control file Q line is used to get the name of the print queue. The suffixes are then processed in turn. You can either simply append them or have a hash translate these values.
Chapter 9. Form Support and Hold Queues
Sometimes jobs require a special setup on a printer, and jobs cannot be printed unless it is done. There are several ways to handle this.
9.1. Hold Queues
Figure 9-1. Hold Queues
    .common=force_localhost:sd=/var/spool/lpd/%P:sh:mx=0

    setup1:tc=.common
      :ah        # always hold incoming jobs
      :lp=lp@localhost
    setup2:tc=.common
      :ah        # always hold incoming jobs
      :lp=lp@localhost
    lp:tc=.common  # print queue
      :ifhp=model=xx
      :filter=/.../ifhp
      :lp=10.0.0.14%9100
Figure 9-2. All Hold Queues
    h110: {853} % lpq -Psetup1
    Printer: setup1@h110 (dest t1@localhost) (autohold)
     Queue: no printable jobs in queue
    Printer: t1@h110 'Test Printer 1' (printing disabled)
     Queue: no printable jobs in queue
    h110: {854} % lpr -Psetup1 /tmp/hi
    h110: {855} % lpq -Psetup1
    Printer: setup1@h110 (dest t1@localhost) (autohold)
     Queue: no printable jobs in queue
     Holding: 1 held jobs in queue
     Server: no server active
     Rank   Owner/ID                  Class Job Files                 Size Time
    hold   papowell@h110+356            A   356 /tmp/hi                  3 15:02:50
    Printer: t1@h110 'Test Printer 1' (printing disabled)
     Queue: no printable jobs in queue
When we print jobs to a :ah or always hold queue, the job is not processed until released. We can release one or all the jobs that are being held.
Figure 9-3. Releasing Jobs for Printing
    h110: {856} % lpc release setup1 all
    Printer: setup1@h110
    setup1: selected 'papowell@h110+356'
    setup1@h110.private: started
    h110: {857} % lpq -Psetup1
    Printer: setup1@h110 (dest t1@localhost) (autohold)
     Queue: no printable jobs in queue
     Status: job 'cfA356h110.private' removed at 15:03:49.053
    Printer: t1@h110 'Test Printer 1' (printing disabled)
     Queue: 1 printable job
     Server: no server active
     Rank   Owner/ID                  Class Job Files                 Size Time
    1      papowell@h110+356            A   356 /tmp/hi                  3 15:03:49
    h110: {858} %
We can release the jobs which are then forwarded to the main queue for printing.
We can also set up Time Release queues using the cron time scheduling system.
Figure 9-4. Releasing Jobs For Scheduled Print Run
    Printcap:
      nightrun:
        :ah        # always hold incoming jobs
        :lp=lp@localhost

    Crontab Entry To Release Jobs:

    #minute hour mday month wday    who command
    1   3   *   *   *   root    /usr/sbin/lpc release nightrun all
You can also use the LPRng class facility. The lpr -Cclass option sets the Cclass line in the control file. You can then use the lpc class facility to select job classes to print.
Figure 9-5. Using Job Classes
    h110: {870} % lpc class t1 top,middle
    Printer: t1@h110
    classes printed 'top,middle'
    t1@h110.private: class updated
    h110: {871} % lpq
    Printer: t1@h110 'Test Printer 1' (classes top,middle)
     Queue: no printable jobs in queue
    h110: {872} % lpr -Clow /tmp/a
    h110: {873} % lpq
    Printer: t1@h110 'Test Printer 1' (classes top,middle)
     Queue: no printable jobs in queue
     Holding: 1 held jobs in queue
     Server: no server active
     Rank   Owner/ID                  Class Job Files                 Size Time
    holdclass papowell@h110+451         L   451 /tmp/a               38404 15:16:39
    h110: {874} % lpr -Ctop /tmp/hi
    h110: {875} % lpq
    Printer: t1@h110 'Test Printer 1' (classes top,middle)
     Queue: no printable jobs in queue
     Holding: 1 held jobs in queue
     Server: no server active
     Status: job 'cfT456h110.private' removed at 15:17:12.932
     Rank   Owner/ID                  Class Job Files                 Size Time
    holdclass papowell@h110+451         L   451 /tmp/a               38404 15:16:39
You can specify a current list of classes to be printed using the lpc class command. As shown in Figure 9-5. the jobs not in the current classes are held until explicitly released or until the class is changed. You can disable the job class facility by setting the class to off.
Figure 9-6. Setting New Job Classes and Disabling Job Classes
    h110: {877} % lpc class t1 low
    Printer: t1@h110
    classes printed 'low'
    t1@h110.private: class updated
    h110: {879} % lpq -ll
    Printer: t1@h110 'Test Printer 1' (classes low)
     Queue: no printable jobs in queue
     Status: finished 'papowell@h110+451', status 'JSUCC' at 15:22:03.178
     Status: subserver pid 84477 exit status 'JSUCC' at 15:22:03.179
     Status: t1@h110.private: job 'cfL451h110.private' printed at 15:22:03.180
     Status: job 'cfL451h110.private' removed at 15:22:03.181

    h110: {39} % lpc class t1 off
    Printer: t1@h110
    all classes printed
    t1@h110.private: class updated
    h110: {40} % lpq
    Printer: t1@h110 'Test Printer 1'
     Queue: no printable jobs in queue
     Status: job 'cfL451h110.private' removed at 15:22:03.181
You can also put a class value into the control file using the incoming_control_filter facility described in Section 8.3.
Figure 9-7. Modifying Control File Using update_class
    lp|lp_*:tc=.common
      :incoming_control_filter=/.../update_class
      :ifhp=model=xx
      :filter=/.../ifhp
      :lp=10.0.0.14%9100
The :incoming_control_filter will now update the class to whatever you want.
Figure 9-8. The update_class Filter
    #!/usr/bin/perl
    ...
      See Figure 5-9

    # read stdin
    my( $file, $Copts, $Q );
    $file = join "", <STDIN>;
    print STDERR "File '$file'\n" if $debug;

    # first use command line Queue name, then control file Q
    # then the printer name, then control file P
    $Q = $opt{Q}; ($Q) = $file =~ /^Q(.*)$/m if not $Q;
    # if no queue name fall back to printer name
    $Q = $opt{P} if not $Q; ($Q) = $file =~ /^P(.*)$/m if not $Q;
    $Q = "" if not $Q;  # stupid -w... sigh...

    # get Copts
    ($Copts) = $file =~ /^C(.*)$/m;
    $Copts = "" if not $Copts; # stupid -w ... sigh ...

    print STDERR "Q '$Q', Copts '$Copts'\n" if $debug;

    # now we split up the name and use as parameters for C option
    while( $Q =~ /_([^_]+)/g ){
        $Copts = $1;
    }
    print "Final '$Copts'\n" if $debug;
    if( $Copts ){
        $file = "C$Copts\n" . $file if( not ($file =~ s/^C.*$/C$Copts/m));
    }
    print $file;
    exit 0
Chapter 10. Interfacing to Vintage, Legacy, and SunOS Print Spoolers
Some legacy, vintage, and other print spoolers do not meet the RFC1179 requirements, or accept only control files with options used by the original BSD (1984 vintage) print spooler and only in the order used by the original BSD (1984 vintage) print spooler. The :bk (Berkely Kompatible) option causes lpd to generate control files compatible with this format. If you encounter problems with transferring files to these systems, try using the :bk option first.
Figure 10-1. Using :bk (Berkeley Kompatible) Flag
    lp:force_localhost@     # make control files berkeley
      :bk
      :lp=...
Chapter 11. Managing Enterprise Level Printing Systems
If you are doing management of more than 20 printers, then you already know the headaches. You need to make the printers available to all/some/none of your users, each user has a different set of requirements, and no two printers are the same. The following are some helpful suggestions and recipes for managing printer information.
11.1. Templates and Standard Configurations
Figure 11-1. Templates in Printcaps
    .common
      :sh:sd=/var/spool/lpd/%P:force_localhost
    .hplj4
      :ifhp=model=hp4
      :filter=/.../ifhp

    # server information
    hp4:server:tc=.common,.hplj4
      :lp=10.0.0.14%9100

    #client information
    hp4:client:lp=%P@server1
You should set up a standard set of templates to see what you have. You can then use lpc to see what the printcap is.
Figure 11-2. Using lpc client all
    .defaults
     :ab@
     ...

    .config

    .all
     :t1
     :t2

    #Printcap Information
    t1|t1_*
     :filter=/usr/local/libexec/filters/ifhp
     :lp=/var/tmp/t1_lp
     :sd=/var/spool/lpd/%P
    t2|Test Printer 2
     :lf=log
     :lp=t1@h110.private
     :sd=/var/spool/lpd/%P
You can use lpc client all to see the printcap information as the LPRng clients would see it. This allows you to check out the various printcaps before you use them. You can also use lpc server all to see the printcap information as the lpd server would see it.
11.2. Master Print Servers, One User Printcap
Figure 11-3. Master User Printcap File, No Local Spooling
    # Just information for clients
    #  list all of the printers for this server
    lp1|lp2|.....
      :client:lp=%Q@server1.private:force_localhost@
    lp99|....
      :client:lp=%Q@server2.private:force_localhost@
This will allow you to send jobs directly to the print server. You use the lp=%Q@server form for the destination. Note that you will need LPRng version 3.8.0 or later for this to work.
11.3. Master Print Servers, Local Spooling
Figure 11-4. Master User Printcap File, Local Spooling
    # Just information for clients
    #  list all of the printers for this server
    lp1|lp2|.....
      :client:lp=%Q@server1.private:force_localhost

    lp99|....
      :client:lp=%Q@server2.private:force_localhost
Observe that you have two queues, one per print server. You use the lp=%Q@server form of the destination. Note that you will need LPRng version 3.8.0 or later for this to work.
11.4. Master Print Servers, Selection by User
Figure 11-5. Master User Printcap File, No Local Spooling
    #  list all of the printers for this server
    lp1|lp2|.....
    OR
    lp1|*
      :client:lp=%Q@server1.private:force_localhost@
      :oh=*.engineering.private

    lp1|lp2|.....
    OR
    lp1|*
      :client:lp=%Q@server2.private:force_localhost@
      :oh=*.marketing.private
You can use the :oh=Pattern to select the set of printcap entries that can be used on a host. The Pattern can be IP Address/netmask (10.0.0.0/24 or 10.0.0.0/255.255.255.0) or a wildcard match for the DNS resovled host name (*.eng.private).
11.5. The Great Grand Dad Of All Printcap Files
Figure 11-6. All In One
    #  list all of the printers for this server
    lp1|lp2|.....
      :client:lp=%Q@server1.private:force_localhost@
      :oh=*.engineering.private
    lp1|lp2|.....
      :client:lp=%Q@server2.private:force_localhost@
      :oh=*.marketing.private
    lp1:server
      :....
    lp2:server
      :....
Add all the printer information in as well. Huge printcap files. But very easy to manage. But how do you get them to the user?
11.6. Using Printcap Filters and Central Databases
Figure 11-7. Printcap Path Configuration Information
    /etc/lpd.conf:

    # Purpose: lpd printcap path
    #   default lpd_printcap_path= (STRING)
    # Purpose: /etc/printcap files
    #   default printcap_path= /etc/printcap   (STRING)
    printcap_path=|/usr/local/libexec/get_printcap
If the /etc/lpd.conf printcap_path value is a filter, then the LPRng application will write the name of the requested printer to the STDIN of the filter program and expect to read one or more printcap entries from STDOUT. If the printcap entry contains a :tc reference, then this entry will be looked up in turn.
Figure 11-8. Example of Returned Printcap Value
    Configuration: printcap_path = |/usr/local/bin/get_ldap_pc

    h110: {917} % lpr -Plp

      Printcap access equivalent to Perlish:
       $printcap = `echo lp | /usr/local/bin/get_ldap_pc`

    Configuration: lpd_printcap_path = |/usr/local/bin/get_lpd_ldap_pc
       lpd server will do:
       $printcap = `echo lp | /usr/local/bin/get_lpd_ldap_pc`
The exercise of building the necessary LDAP database, extracting the information in a printcap form using the Perl
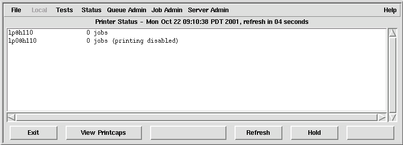
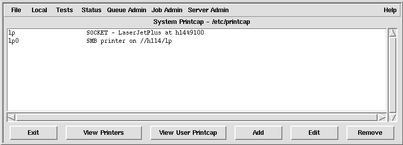
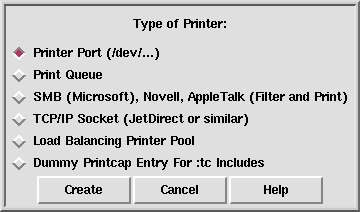
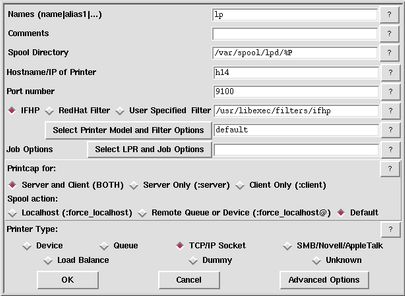

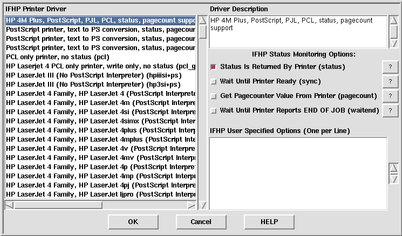
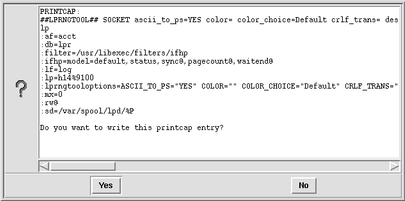
Appendix A. LPRng
The LPRng print spooler software was developed to be robust, reliable, secure, scalable, and portable. It has been used since 1988 in extremely demanding academic printing environments such as University of Minnesota, MIT, and Rutgers, commercial companies such as Dow Jones and Abbot Pharmaceuticals, as well as being distributed with Linux, FreeBSD, and other systems. Each of these environments has a unique set of problems, demanding various configuration and administrative capabilities. For example, the simple single user system with a single or limited number of printers requires easy configuration and simple diagnostic procedures, while the network based printing system requires highly robust error logging, authentication, and failover support. LPRng provides a highly flexible configuration system that allows it to perform optimally in all of these environments.
The LPRng software has three components: the lpd print spooler and the user client applications lpr, lpq, lprm, etc.; the IFHP print filter (ifhp) which is used to convert jobs into a suitable for a particular printer, and the the LPRngTool Graphic User Interface (lprngtool) which provides a simple and easy to use configuration and monitoring tool for the LPRng print spooler.
LPRng mimics many of the features of the vintage or legacy Berkeley (University of California - Berkeley) Line Printer (LPR) package found on Berkeley derivatives of the Unix operating system. LPRng will print a document with little or no knowledge of the content or special processing required to print the document on a stand-alone machine or in a distributed printing environment. New (as compared to Berkeley LPR) features include: lightweight lpr, lpc and lprm programs, dynamic redirection of print queues, automatic job holding, highly verbose diagnostics, load balancing queues; enhanced security (SUID not required in most environments), and easy configuration.
LPRng started life at the University of Waterloo in 1986 as PLP (Public Line Printer), a replacement for the original BSD lpd code. This was a one-shot effort by the author, Patrick Powell, to develop freely redistributed code without the restrictions of the BSD/AT&T license and would allow non-licensed sites to fix and patch problems. From 1988 to 1992 individuals and groups added features, hacked, slashed, and modified the PLP code, coordinated largely by Justin Mason (<jmason@iona.ie>) who started the LPRng mailing list.
In 1992 while at San Diego State University Prof. Powell redesigned and reimplemented the PLP code and named the result LPRng. The goals of the LPRng project were to build a server system that was as close to user abuse proof as possible, that would provide services limited only by the inherent capacities of the support system, RFC1179 compliant, and with extensive debugging capabilities to allow quick and easy diagnostics of problems.
In 1999 the code base for LPRng was again reorganized in order to provide a common method for running on non-UNIX platforms such as Microsoft Windows NT, Apple Rhapsody, and embedded systems.
As a side effect of this work, many security problems that could develop were identified and steps taken to ensure that they were not present in LPRng. For example, LPRng clients such as lpr, lprm, lpc, and lpq can run as ordinary users programs, the lpd server can run as a non-root user once a network port has been opened, and all text formatting operations done by LPRng use a very restricted and highly secure version of the snprintf function.
A.1. Documentation
The main LPRng documentation is the LPRng-HOWTO, which is available in several formats. Information about LPRng and the latest release can be found on the LPRng web page http://www.lprng.com/LPRng.html
The ifhp documentation is the IFHP-HOWTO, which is available in the ifhp distribution. Information about ifhp and the latest release can be found on the LPRng web page http://www.lprng.com/LPRng.html
There is also a mailing list at lprng@lprng.com. To post to the list you must subscribe by sending send an email to lprng-request@lprng.com, with the message subject or body containing the word `subscribe' or `help'.
Several presentations of LPRng and print spooling software have been made at the Large Installation System Administrator (LISA) conferences. The presentation at the LISA 98 conference is in the PowerPoint file LISA98.ppt in the LPRng distribution documentation.
A.2. Installation
It is recommended that installation be done from the source distribution, and that the files be put in the /usr/bin, /usr/sbin, and /etc directories, as most existing applications require them there.
Get the source code distribution from the main LPRng site or one of the mirror sites show in Section A.5. The install using:
    %> gunzip -c LPRng-XXX.tgz | tar xvf -
    %> cd LPRng-XXX
       (You might want to read the README and INSTALL files)
    %> ./configure --prefix=/usr --sysconfdir=/etc
       #if your OS does not support shared libraries, use:
       # ./configure --disable-shared --prefix=/usr --sysconfdir=/etc
    %> make clean all
    %> su
    password: xxxxx
    #> make install
A.3. License
The LPRng Print Spooler and the ifhp Print Filter software are distributed under the GNU Public License (GPL) and the Artistic License. Users can choose to redistribute or use the software under a license that is appropriate for their purpose. Other licenses and distribution agreements are available by contacting AStArt Technologies for information.
A.4. Commercial Support
AStArt Technologies provides commercial support and enhancements for the LPRng and other network software. AStArt provides network and system consulting services for UNIX and NT systems, as well as real time and network software.
A.5. Web Site, FTP Site, and Mirrors
Web Page: http://www.lprng.com
Main FTP Site:
| ftp://ftp.lprng.com/pub/LPRng (US) |
Mirrors:
A.6. Mailing List
To join the LPRng mailing list, please send mail to lprng-request@lprng.com with the word 'subscribe' in the BODY.
The LPRng mailing list is archived on http://www.findmail.com/list/lprng
A.7. PGP Public Key
The LPRng distributions have an MD5 checksum calculated, which is then signed with a PGP public key. Here is the key for validating the checksums:
    Type Bits/KeyID    Date       User ID
    pub  1024/00D95C9D 1997/01/31 Patrick A. Powell \
       <papowell@lprng.com>

    -----BEGIN PGP PUBLIC KEY BLOCK-----
    Version: 2.6.3i

    mQCNAzLygTQAAAEEANBW5fPYjN3wSAnP9xWOUc3CvsMUxjip0cN2sY5qrdoJyIhn
    qbAspBopR+tGQfyp5T7C21yfWRRnfXmoJ3FVtgToAsJUYmzoSFY08eDx+rmSqCLe
    rdJjX8aG8jVXpGipEo9U4QsUK+OKzx3/y/OaK4cizoWqKvy1l4lEzDsA2VydAAUT
    tCdQYXRyaWNrIEEuIFBvd2VsbCA8cGFwb3dlbGxAYXN0YXJ0LmNvbT6JAJUDBRA0
    XonoiUTMOwDZXJ0BAQ2cBAC7zU9Fn3sC3x0USJ+3vjhg/qA+Gjb5Fi1dJd4solc4
    vJvtf0UL/1/rGipbR+A0XHpHzJUMP9ZfJzKZjaK/d0ZBNlS3i+JnypypeQiAqo9t
    FV0OyUCwDfWybgAORuAa2V6UJnAhvj/7TpxMmCApolaIb4yFyKunHa8aBxN+17Ro
    rrQlUGF0cmljayBBLiBQb3dlbGwgPHBhcG93ZWxsQHNkc3UuZWR1PokAlQMFEDLy
    gTSJRMw7ANlcnQEBYBYD/0zTeoiDNnI+NjaIei6+6z6oakqO70qFVx0FG3aP3kRH
    WlDhdtFaAuaMRh+RItHfFfcHhw5K7jiJdgKiTgGfj5Vt3OdHYkeeh/sddqgf9YnS
    tpj0u5NfrotPTUw39n6YTgS5/aW0PQfO9dx7jVUcGeod1TGXTe9mIhDMwDJI4J14
    =3Zbp
    -----END PGP PUBLIC KEY BLOCK-----
Appendix B. References and Standards
The following references and standards have been used in the development of the LPRng software.
B.1. RFCs
During the early development of the Internet developers did not want to go through the laborious process of developing formal standards and applying to a standards body such as the EIA, IEEE, or ISO. Instead, they called the standards documents they developed [Requests for Comments]. These soon became de facto standards, and with the formal acceptance of the TCP/IP protocol as a network standard, de jure as well.
You can get copies of the RFCs from literally hundreds of network sites, including http://www.isi.edu, http://www.faqs.org/rfcs, NIS.NSF.NET, RFC.JVNC.NET, or FTP.ISI.EDU.
The [RFC1179 - Line Printer Daemon Protocol] describes the protocol used to transfer jobs from client program to print server. See RFC1179 for more a discussion of this protocol and more details about the RFC. The rfc1179.txt file is included in the LPRng distribution documentation.
B.2. PostScript
PostScript is one of the de facto standards for print jobs. The Adobe Corporation (http://www.adobe.com) provides an excellent set of references for the PostScript language. They have made many of these available for downloading from their web sites or have published them in book form.
The [PostScript Language Reference Manual] contains a great deal of technical information about the PostScript Language, and is the language reference manual.
The [PostScript Language Tutorial and Cookbook] is a very nice and easy to read introduction to PostScript programming, and has some very useful utilities. Combined with GhostScript and the gv display program you can very easily learn to write your own small PostScript programs, and more importantly, can learn to understand the contents of PostScript files.
The [PostScript Language Program Design] is the companion to the [PostScript Language Tutorial and Cookbook], and has more complex examples of PostScript programs. More importantly, it also introduces, although without explanation, the PostScript Document Structuring Conventions described in Appendix G of the The [PostScript Language Reference Manual]. This alone makes it useful.
B.3. HP PCL 5
The Hewlett-Packard (HP) PCL Printer Language is the second de-facto standard for print jobs. Currently, Hewlett-Packard makes documentation for PCL available through their [Developer Program]. You will need to register and then search their site for the [PCL 5 Printer Language Reference Manual].
B.4. HP PJL
The Hewlett-Packard (HP) Printer Job Language is used to control various features of HP printers. The [Printer Job Language Reference Manual] is also available from Hewlett-Packard (http://www.hp.com) through their [Developer Program].
B.5. PDF
The Portable Document Format (pdf) was developed by Adobe to be a more useful method of distributing documentation for view by online systems and software. The [Portable Document Format Reference Manual] is available from Adobe (http://www.adobe.com). While pdf is not used directly as a print job language, it is one of the more common formats for files that need to be printed. It can be converted to PostScript by most pdf viewers such as GhostScript and Adobe Acrobat.
Appendix C. RFC 1179 - Line Printer Daemon Protocol
RFC1179 can be obtained from the LPRng distribution, in the LPRng_DOC/rfc1179 directory, or from one of many sites which mirror the RFCs.
This RFC is an informational RFC, which means that the information in it is meant as a guide to users, and not as a fixed standard. In addition, the RFC tried to document the behavior of the BSD lpd print server, and left out many details dealing with error recover, error messages, extensions to the protocol, etc.
In this section, I will try to explain what RFC1179 specifies as a protocol, and many of the problems encountered in trying to use it.
C.1. Ports and Connections
Options used:
-
lpd_port=Port for lpd to accept connection
-
originate_port=Ports to originate connections on
-
reuse_addr FLAG Set SO_REUSEADDR flag on connection
-
retry_econnrefused FLAG Retry on connect ECONNREFUSED error
-
retry_nolink FLAG Retry on device open or connection ffailure
-
socket_linger=socket linger timeout
RFC1179 requires that the lpd server listen for TCP/IP connections on port 515. This port is registered with the Internet Naming Authority, and the /etc/services file or TCP/IP services database usually has an entry:
RFC1179 explicitly states that all connections to port 515 must originate from ports 721-731. The reason for this restriction is due to the UNIX concept of reserved and privileged ports. By convention, ports in the range 1-1023 can only bound by processes whose Effective User ID (EUID) is 0 (root). This, ordinary users could not originate a connection from the reserved or privileged port range.
In a UNIX environment, this means that the user programs lpr, lpq, lprm, and lpc would have to be SETUID root.
As experience has shown, for security purposes, the fewer programs that need to have privileged status, the better. LPRng uses the lpd_port=printer configuration option to set the actual port to be use. By default, this is port 515, but can be set to other values.
The restriction of originating ports to 721-731 causes another set of problems. Part of the TCP/IP protocol is concerned with avoiding communications problems resulting from the arrival of old or stale packets. When a connection between sourcehost, sourceport and desthost, destport is made, a set of sequence numbers is established and used for sending and acknowledgement of data. When the connection terminates, the TCP/IP protocol restricts the establishment of a new connection between sourcehost, sourceport and desthost, destport for a period long enough for all stale packets to be removed from the system. This is approximately 10 minutes long.
In order to simplify assignments of ports, timing out connections, and other matters, many TCP/IP packages do keep track of explicit connections originating from a port, but simply prevent the port from being reused for either origination or reception of a connection. They do, however, keep track of the active connections to a port, and perform timeouts on these. This is usually much simpler to implement, as it can be done with a list attached to the port.
This implementation method creates some problems when a large number of connections must be originated from a relatively small number of port numbers. Observe what happens when host 1 tries to send a large number of jobs to a server 2. The following connections are established and terminated: host 1, port 721 and host 2, port 515 host 1, port 722 and host 2, port 515 host 1, port 723 and host 2, port 515 host 1, port 724 and host 2, port 515 host 1, port 725 and host 2, port 515 host 1, port 726 and host 2, port 515 host 1, port 727 and host 2, port 515 host 1, port 728 and host 2, port 515 host 1, port 729 and host 2, port 515 host 1, port 730 and host 2, port 515 host 1, port 731 and host 2, port 515
Now according to the RFC1179 rules and the TCP/IP protocol, we will have to wait until one of these connections terminates before we can make another. On the originating system, if the TCP/IP implementation does timeouts on the originating port, we will have to wait for the timeout to elapse before we can make a new connection. Unfortunately, there is no way to find out what the status of the port is, so we will have to try them each in turn until we get a successful connection.
The LPRng code has tried to provide several methods to deal with these problems. Firstly, the originate_port=512 1023 option specifies the range of ports used to originate connections when the software is running either as ROOT or SETUID root. By strict RFC1179 rules, this should be originate_port=721 731, but it turns out that most BSD lpd based implementations only check for a reserved originating port. By using 512 ports we get a greatly reduced rate of errors due to lack of ports due to pending timeouts.
However, on some systems which are acting as servers for a large number of printers even increasing this port range is insufficient, and steps need to be taken use the originating port numbers more efficiently. The Berkeley TCP/IP implementation getsockopt() and setsockopt() allows the user to manipulate some of the underlying timeouts and options of the TCP/IP network. When a TCP/IP connection is established, the setsockopt() facility can be used to set the SO_REUSEADDR flag on the connection. This flag effectively sets the timeout value on the ports and connections to 0, allowing immediate reuse of the ports. When done on an originating end of a connection, this will allow the originating port number to be reused immediately.
It would appear that by setting SO_REUSEADDR on the originating end that we have solved our problems. However, unless the destination end of the connection sets its SO_REUSEADDR flag on the connection, it will still do a timeout. Thus when we try to make a connection from a port that was active within a short period of time to the same host, then it will reject the connection until the timeout is over.
The reuse_addr flag (default off) forces the LPRng software to set the SO_REUSEADDR flag on originating connections. As indicated, this will allow ports to be reused immediately for outgoing connections, rather than waiting for a timeout.
While the reuse_addr flag usually allows us to reuse ports, there is still the problem of dealing with connections failing due to the remote site rejecting the connection due to a pending timeout from a previous connection. A careful study of the original BSD TCP/IP network code and of some others indicates that when a connection fails due to a pending timeout, an ECONNREFUSED error code is returned to a connect() system call. If this happens and we suspect that the remote site is rejecting the connection due to a timeout problem, then we should retry making the connection but from a new port, and continue retrying until all possible ports are used.
The retry_econnrefused (default on) flag is used to specify that we retry connections in this manner. When this is set, a connection refused error causes the connection to be retried using a new port. This will be repeated until all available ports have been tried.
When printing a job and the lpd server connection to a remote site or device open fails, the retry_nolink (default on) will cause the attempt to be retried indefinitely. The combination of retry_econnrefused and retry_nolink will provide robust connection attempts to remote systems.
While the above problems cause difficulties when making connections, there are also problems when terminating connections. After closing a socket, the TCP/IP software will try to flush any pending data to the destination. Unfortunately, on some systems it will only do this while the process is active. This has caused problems on systems which terminate a process it has received an abnormal (signal caused) termination.
The setsockopt() SO_LINGER option allows the user to specify that when a socket is closed normally, that the process should block until pending data is flushed or for the socket_linger period. If socket_linger is 0, then no SO_LINGER operation is done.
In summary, if you experience problems with connection failures due to port exhaustion, first try setting the reuse_port flag, and you should see a reduction. Check to ensure that the retry_econnrefused and retry_nolink flags are set, and the error code in the log and status files. If the failures continue, then the problem is caused by the remote end having timeout limitations and there is little you can do except to set a very long connect_retry interval, say connect_retry=120 (2 minutes).
C.2. Protocol Requests and Replies
Options used:
-
remote_support=Remote operations supported
After a connection has been established, a request can be sent to the lpd server. The request consists of a single octet indicating the request type, followed by the printer (or print queue) name, followed by a set of options for the request, followed by a LF (line feed) character.
Table C-1. RFC1179 Commands
| NNN | RFC1179 | Operation | program |
|---|---|---|---|
| 1 | yes | start print | lpc |
| 2 | yes | transfer a printer job | lpr |
| 3 | yes | print short form of queue status | lpr |
| 4 | yes | print long form of queue status | lpr |
| 5 | yes | remove jobs | lprm |
| 6 | LPRng | do control operation | lpc |
| 7 | LPRng | transfer a block format print job | lpr |
| 8 | LPRng | secure command transfer | lpc |
| 9 | LPRng | verbose status information | lpr |
After the request has been sent, then a reply will be returned. In general the reply has the following form:
As can be seen, this protocol is extremely simple, but there are a set of problems due to the loosely written language of RFC1179.
-
Firstly, while RFC1179 sets limits on the lengths of commands, it does not strictly set limits on the characters set used in the commands. This can result in problems when trying to print status information, headers on banners, and other details.
-
The original RFC1179 protocol did not provide any way to do remote control of queues or lpd servers. This has been added to the protocol. As a side effect, if you try to use lpc to control a non-LPRng printer, it will not work.
-
You can specify that a network printer is non-LPRng by using the remote_support=RQVMC option and specify the operations supported by the printer. The letters R, Q, M, and C stand for lpr, lpq, lprm, and lpc operations respectively, and indicate that these are supported. If remote_support does not allow a particular operation, then the LPRng software will not send a corresponding request to the printer. For example, remote_support=R would restrict operations to spooling jobs only, and the LPRng software would not query the printer for status.
C.3. Job Transfer
Options used:
-
longnumber FLAG Long job number (6 digits)
-
send_data_first FLAG Send data files first
-
use_shorthostUse short hostname
A job transfer operation starts with a job transfer request, followed by several file transfer operations. At the end of the file transfers, the connection should be closed.
A file transfer request has the form:
| Command | Purpose |
|---|---|
| \001\n | abort |
| \002nnnn cfname | control file transfer |
| \003nnnn dfname | data file transfer |
The abort operation is used to terminate job transfer and indicate that the job should not be processed for printing. The connection will be closed and the partly transferred job will be discarded.
The control file and data file transfer commands have a length (in bytes) of the file and the name of the file to be transferred. When the command is received, the server will reply with a status line:
The reply is only a single octet. Some defective implementations of RFC1179 send a LF after the octet, which makes life very difficult. LPRng makes an effort to detect these non-conforming RFC1179 systems and will accept jobs from them. However, it will not send jobs to them.
If LPRng sends a reject code, as an extension to RFC1179 it also sends an error message. Note that the values for error codes are not defined, nor are their causes. LPRng uses the following values for error codes, which appear to be compatible with many, but not all, of the BSD lpd based systems:
| Code | Error |
|---|---|
| \000 | Accepted, proceed |
| \001 | Queue not accepting jobs |
| \002 | Queue temporarily full, retry later |
| \003 | Bad job format, do not retry |
When the sender gets the reply indicating success, it sends the nnnn bytes of the control or data file, followed by a \000 octet. The receiver will then reply as above; a single \000 octet indicating success.
The above procedure is carried out until all data files and the control file of a job are transferred.
RFC1179 is silent on the following issues:
-
When sending a job, do you send the control file first, followed by the data file(s), or the data files first?
-
When sending multiple jobs, can you send them on a single connection, or do you have to establish a new connection for each job?
LPRng will accept jobs whether they are sent control or data files first. By default, it sends the control file first, followed by the data file. If the destination system requires that the data files be sent first, the send_data_first printcap option can be used to force data files to be sent first.
The name of the control file ... should start with ASCII "cfA", followed by a three digit job number, followed by the host name which has constructed the control file.
The should in this wording indicates that this is simply a guideline, and that other formats are possible. Some of the major problems with this format are as follows:
-
The restriction to 3 digits means that at most 1000 jobs can be in a queue. Strangely, some systems generate far more than 1000 jobs a day, and need to archive them on a regular basis. The longnumber option will allow LPRng to use a 6 digit job number for files in the print queue.
-
The host name format is not specified. Some implementations consider that this is the short host name, while others think it is the fully qualified domain name (FQDN). LPRng, by default, will use the FQDN host name. However, the use_shorthost option will force it to use short host names in control and data files.
-
The cfA control file name was modified to allow the job priority to be used as the A letter of the control file. By default, this is A (lowest, i.e. cfA) and but can range to Z (highest, i.e. cfZ). All known spoolers except LPRng seem to ignore the actual value of the letter.
C.4. Data File Transfer
As mentioned before a data file is transferred using the command below.
The data file may contain any 8 bit values at all. The total number of bytes in the stream may be sent as the first operand, otherwise the field should be cleared to 0. The name of the data file should start with ASCII "dfA". This should be followed by a three digit job number. The job number should be followed by the host name which has constructed the data file. Interpretation of the contents of the data file is determined by the contents of the corresponding control file.
There are several surprises in RFC1179.
-
Apparently a job should only consist of a single data file. This is a severe limitation, and in fact the BSD lpr and other print spoolers process jobs with multiple data files. By convention, these data files have names of the form dfA, dfB, ... dfZ, dfa, dfz.
-
The RFC does not specify that the control file and data file job numbers must be identical. Most implementations follow this convention, which simplifies life tremendously.
-
The RFC does not specify that the control file and data file job host names must be identical. Most implementations follow this convention, which simplifies life tremendously.
-
A zero length data file does not cause a data transfer to take place. LPRng modifies this action to be slightly different. When a zero length data file transfer is indicated, all of the input until the connection is closed is used as the contents of the data file.
When piping into the lpr program, this can be very useful as it eliminates the need to create temporary files on the local host. Note that some print spoolers do not use this interpretation, and this option should be used carefully.
C.5. Control File Contents
The control file consists of a set of lines which either provide printing information or specify data files to be printed. The information lines start with upper case letters or digits, while the data files lines start with lower case letters. Here is a sample control file:
    Hh4.private
    J(stdin)
    CA
    Lpapowell
    Apapowell@h4+955
    Ppapowell
    fdfA955h4.private
    N(stdin)
    UdfA955h4.private
The following are the letters and their meanings in the control file.
Table C-2. Control File Lines and Purpose
| Letter | Defined | Purpose |
|---|---|---|
| A | LPRng | Identifier for job |
| C | RFC1179 | Class for banner page |
| H | RFC1179 | Host name |
| I | RFC1179 | Indent Printing |
| J | RFC1179 | Job name for banner page |
| L | RFC1179 | Print banner page |
| M | RFC1179 | Mail When Printed |
| N | RFC1179 | Name of source file |
| P | RFC1179 | User identification |
| Q | LPRng | Queue name |
| R | LPRng | Accounting info |
| S | RFC1179 | Symbolic link data |
| T | RFC1179 | Title for pr |
| U | RFC1179 | Unlink data file |
| W | RFC1179 | Width of output |
| Z | LPRng | Filter options |
| 1 | RFC1179 | troff R font |
| 2 | RFC1179 | troff I font |
| 3 | RFC1179 | troff B font |
| 4 | RFC1179 | troff S font |
| c | RFC1179 | Plot CIF file |
| d | RFC1179 | Print DVI file |
| f | RFC1179 | Print formatted file |
| g | RFC1179 | Plot file |
| k | RFC1179 | Reserved for use by Kerberized LPRng clients and servers. |
| l | RFC1179 | Print file leaving control characters |
| n | RFC1179 | Print ditroff output file |
| o | RFC1179 | Print Postscript output file |
| p | RFC1179 | Print file with 'pr' format |
| t | RFC1179 | Print troff output file |
| v | RFC1179 | Print raster file |
| z | RFC1179 | Reserved for future use with the Palladium print system. |
The A (Identifier) line was introduced to record a unique system wide job identifier for LPRng submitted jobs. This is basically formed from the user name, job number, and host at the time of submission. For example: papowell@h4+955 is job number 995 submitted by papowell from host h4.
The C (Class) line is set by the lpr -C class option, and the value can be used to control printing. For example, the lpc class zone command would restrict job printing to only jobs with class zone.
The H (hostname), P (username), and J (jobname) fields are used to identify the host and user which sent the job, and to provide information to be displayed by lpq when reporting job status.
The L (print banner page) field is one that has caused many problems for users. RFC1179 indicates that its presence causes the banner page to be printed, and its absence suppresses banner pages. The lpr -h option suppresses putting this line into the control file. Usually the L field is a duplicate of the P field.
The M (mail information) field supplies a mail address for LPRng to send mail to when a job is completed.
The N (file name) field is usually provided to identify the file name corresponding to the data file. This can be used to print names on page separators, etc. LPRng largely ignores this line.
The I (indent) and W (width) fields are supposed to specify a page indent and width for printing. These fields are passed to filters if they are present.
The Q (queue name) field is an LPRng extension, and contains the name of the print queue the job was originally sent to.
The R (accounting info) field was added by LPRng to allow a specified account to be billed for job printing. The lpr -Rname option can be used to specify the accounting name.
The S (symbolic link) and U (unlink after printing) lines were used by the original BSD lpd print system to control how it passed files to the print server. LPRng ignores these lines. In fact, it will remove S lines and force the U lines to refer only to job data files. This closes a nasty security loophole on non-LPRng print spoolers.
The T (pr job title) is used with the lpr -p operation to supply a banner to the pr program.
The Z (filter options) value is specified with lpr -Zoption and is passed to the data file filters during the printing operation.
All of the lower case letters are reserved for format specifications for data files. In the control file, these are followed by the name of the data file to which they correspond. While in principle different data files in the control file can have different formats, this has not been implemented in any known spooling system.
C.6. lpq Requests
The RFC1179 protocol specifies that lpq print status requests can be sent to the lpd server. The lpq requests have the format:
The lpd print server will then return queue status and close the data connection.
RFC1179 does not state in any manner what the format of the queue status should be. Thus, implementors have been free to augment or change the status as they like. Even the BSD lpq status format has been changed from different versions.
The id values are used to select the jobs to be displayed. LPRng displays any job whose ID, hostname, or user name information from the control file A, H, or P fields match any of the id values.
Note that since there is no identification of the information requestor, then restriction of information is almost impossible.
C.7. lprm Requests
The RFC1179 protocol specifies that lprm job removal requests can be sent to the lpd server. The lpq requests have the format:
The lpd print server will search the specified print queue and remove any job whose ID, hostname, or user name information from the control file A, H, or P fields match any of the id values and for which the user has permission to perform a removal operation.
Most RFC1179 compatible spoolers use the user information in the request as the name of the user which spooled the job. However, in a network environment this is extremely easy to fabricate, and is at best a weak type of authentication.
C.8. LPC Requests
LPRng has extended the RFC1179 protocol to allow queue and printer control commands to be sent to the lpd server. The format of these commands are:
The following commands are supported.
Table C-3. LPC Commands
| Command | Operation |
|---|---|
| Command | Operation |
| active [printer[@host]] | check to see if server accepting connections |
| abort (printer[@host] | all) | terminate server process printing job |
| disable (printer[@host] | all) | disable queueing |
| debug (printer[@host] | all) debugparms | set debug level for printer |
| enable (printer[@host] | all) | enable queueing |
| hold (printer[@host] | all) (name[@host] | job | all)* | hold job |
| holdall (printer[@host] | all) | hold all jobs on |
| kill (printer[@host] | all) | stop and restart server |
| lpd [printer[@host]] | get lpd PID for server |
| lpq (printer[@host] | all) (name[@host] | job | all)* | invoke lpq |
| lprm (printer[@host] | all) (name[@host]|host|job| all)* | invoke lprm |
| move printer (user|jobid)* target | move jobs to new queue |
| noholdall (printer[@host] | all) | hold all jobs off |
| printcap (printer[@host] | all) | report printcap values |
| quit | exit LPC |
| redirect (printer[@host] | all) (printer@host | off )* | redirect jobs |
| release (printer[@host] | all) (name[@host] | job | all)* | release job |
| reread [printer[@host]] | lpd reread database information |
| start (printer[@host] | all) | start printing |
| status (printer[@host] | all) | status of printers |
| stop (printer[@host] | all) | stop printing |
| topq (printer[@host] | all) (name[@host] | job | all)* | reorder job |
| defaultq | default queue for lpd server |
| local (printer | all) | client printcap and configuration information |
| server (printer | all) | server printcap and configuration information |
Many of these commands support extremely specialized operations for print queue management, However, the following are the most commonly used and are supported by the BSD lpd print spooling system as well:
-
start, stop, enable, disable Start and stop will start and stop printing for a specified queue. Enable and disable enable and disable sending and/or accepting jobs for the queue.
-
abort, kill Abort will cause the process doing the actual job printing to be terminated. Kill does an abort, and then restarts the printing process. These commands are used to restart a queue printing after some disaster.
-
topq Places selected jobs at the top of the print queue.
-
status Shows a status display of the print spools on the server.
The following commands are extensions to the basic set provided by the BSD lpd system.
-
lpq, lprm Invokes the lpq or lprm program from lpc. Useful when in the interactive mode.
-
hold, holdall, release The hold command will cause the selected jobs to be held until released. The holdall jobs sets all jobs submitted to the queue to be held until released. The release command releases jobs for printing. If a job has had an error and is in the error state, the release command will cause it to be reprinted.
-
move, redirect The move command will move selected jobs to the specified spool queue. The redirect command sends all jobs submitted to the queue to be sent to the specified queue.
-
active, lpd, reread The active command will connect to the server for the printer. This is used to check to see if non-LPRng print servers are active. The lpd command will connect to the server and get the process id (PID) of the lpd server. The reread command causes a SIGHUP signal to be sent to the lpd process, causing it to reread the lpd.conf, printcap, and lpd.perms files. This is done when configuration information has been modified and the administrator wants to have the server use the new information.
-
debug This is a desperation facility for developers that allows dynamic enabling of debug information generation. Not normally used in general operation.
-
local, server These commands will print out the configuration information in the local lpd.conf file, as well as the printcap information for the specified printers; client prints what the LPRng clients (lpr, lpq, ...) would use while server prints what the LPRng server (lpd) would use if running on this host. This is an extremely useful diagnostic tool for administrators. Not normally used in general operation.
C.9. Block Job Transfer
Options used:
-
send_block_format FLAG Transfer job as a block
In normal job transfer operations, the sender and receiver have a handshake interaction in order to transfer a print job. Each file is sent individually. The send_block_format option forces a Block Job Transfer operation. This causes the sender to transfer a single file containing all the job printing information, including control file and data files.
The transfer command line has the form:
The receiver will return any acknowledgement of a single 0 octet, and then the size bytes of the job will be transferred by the sender. At the end of the transfer a single 0 octet is added, and the receiver will indicate success by returning a single 0 octet. Any other value returned by the receiver indicates an error condition.
The file transferred by the sender is simply the command lines that it would have normally sent for job transfer, followed by the control or data file values.
C.10. Authenticated Transfer
RFC1179 does not provide any authentication or encryption mechanism for the transfer of jobs or commands to the lpd print server. The Authenticated Transfer operation was added to allow an encrypted or authenticated transfer of print jobs or commands.
Since there are various restrictions on the incorporation of authentication facilities into programs, LPRng supports authentication by providing a simple interface to encryption programs.
The idea is that when authentication is required when sending a job, LPRng will generate a block transfer job as described for the Block Job Transfer operation, and then invoke a set of programs to encryt and transfer the file, and encrypt and transfer the returned status.
Similarly, when sending a command, the command information will be placed in a file and the encrypted file will be transferred.
This technique means that the programs and support to do encryption are external to LPRng, and can use any type of method that they choose to implement the secure and/or authenticated transfer.